
Scanning a container image for vulnerabilities or bad practices on Jenkins using Sysdig Secure is a straightforward process. This article demonstrates a step-by-step example of how to do it using the Sysdig Secure Jenkins plugin.
This blog post is focused on the vulnerability scanner available since April 2022. If you are using the legacy scanner, see the official documentation for more information about it.
You can go straight to the pipeline definition here.
How Sysdig Secure Scans for Image Vulnerabilities
With image scanning you can discover vulnerabilities in your container images at a much earlier point in the production pipeline. Detecting compromised images before they are pushed to a container registry, or before the containers are deployed in your production environments makes the whole process far more secure. It means your team gets to shift security left, finding and fixing problems much more quickly.
Sysdig categorizes the vulnerability scan results in two sections, depending on the point where the scanning was performed:
- Pipeline: Before the runtime phase (in the developer workstation, in a CI/CD pipeline, etc.) performed by the
sysdig-cli-scannertool. - Runtime: When the image is running in the execution node and the scanning is performed by a Sysdig agent.
In this article, we will cover how to perform scanning on the pipeline step using Jenkins, as it is a best practice to adopt.
Running the scanner against a container image is as simple as running the sysdig-cli-scanner tool with a few flags (see the official documentation for more information), such as:
SECURE_API_TOKEN=<your-api-token> ./sysdig-cli-scanner --apiurl <sysdig-api-url> <image-name> --policy <my-policy>
Code language: JavaScript (javascript)
The image is scanned locally on the host where the tool is executed, on your laptop or a container running the pipeline, and only the scanning results are sent to the Sysdig Secure backend.
The Sysdig Secure Jenkins plugin wraps the sysdig-cli-scanner so it can be consumed easily in your Jenkins environment. It can be used either in a Pipeline job or added as a build step to a Freestyle job to automate the process of running an image analysis, evaluating custom policies against images and performing security scans.
Vulnerability scanning with Jenkins
Jenkins is an open source automation server, allowing you to automate software development tasks creating powerful CI/CD (continuous integration/continuous delivery or deployment) workflows triggered by different events. It is one of the most known CI/CD tools and it has a rich plugin ecosystem for integrations and tools ready to be used (1800+ community plugins!).
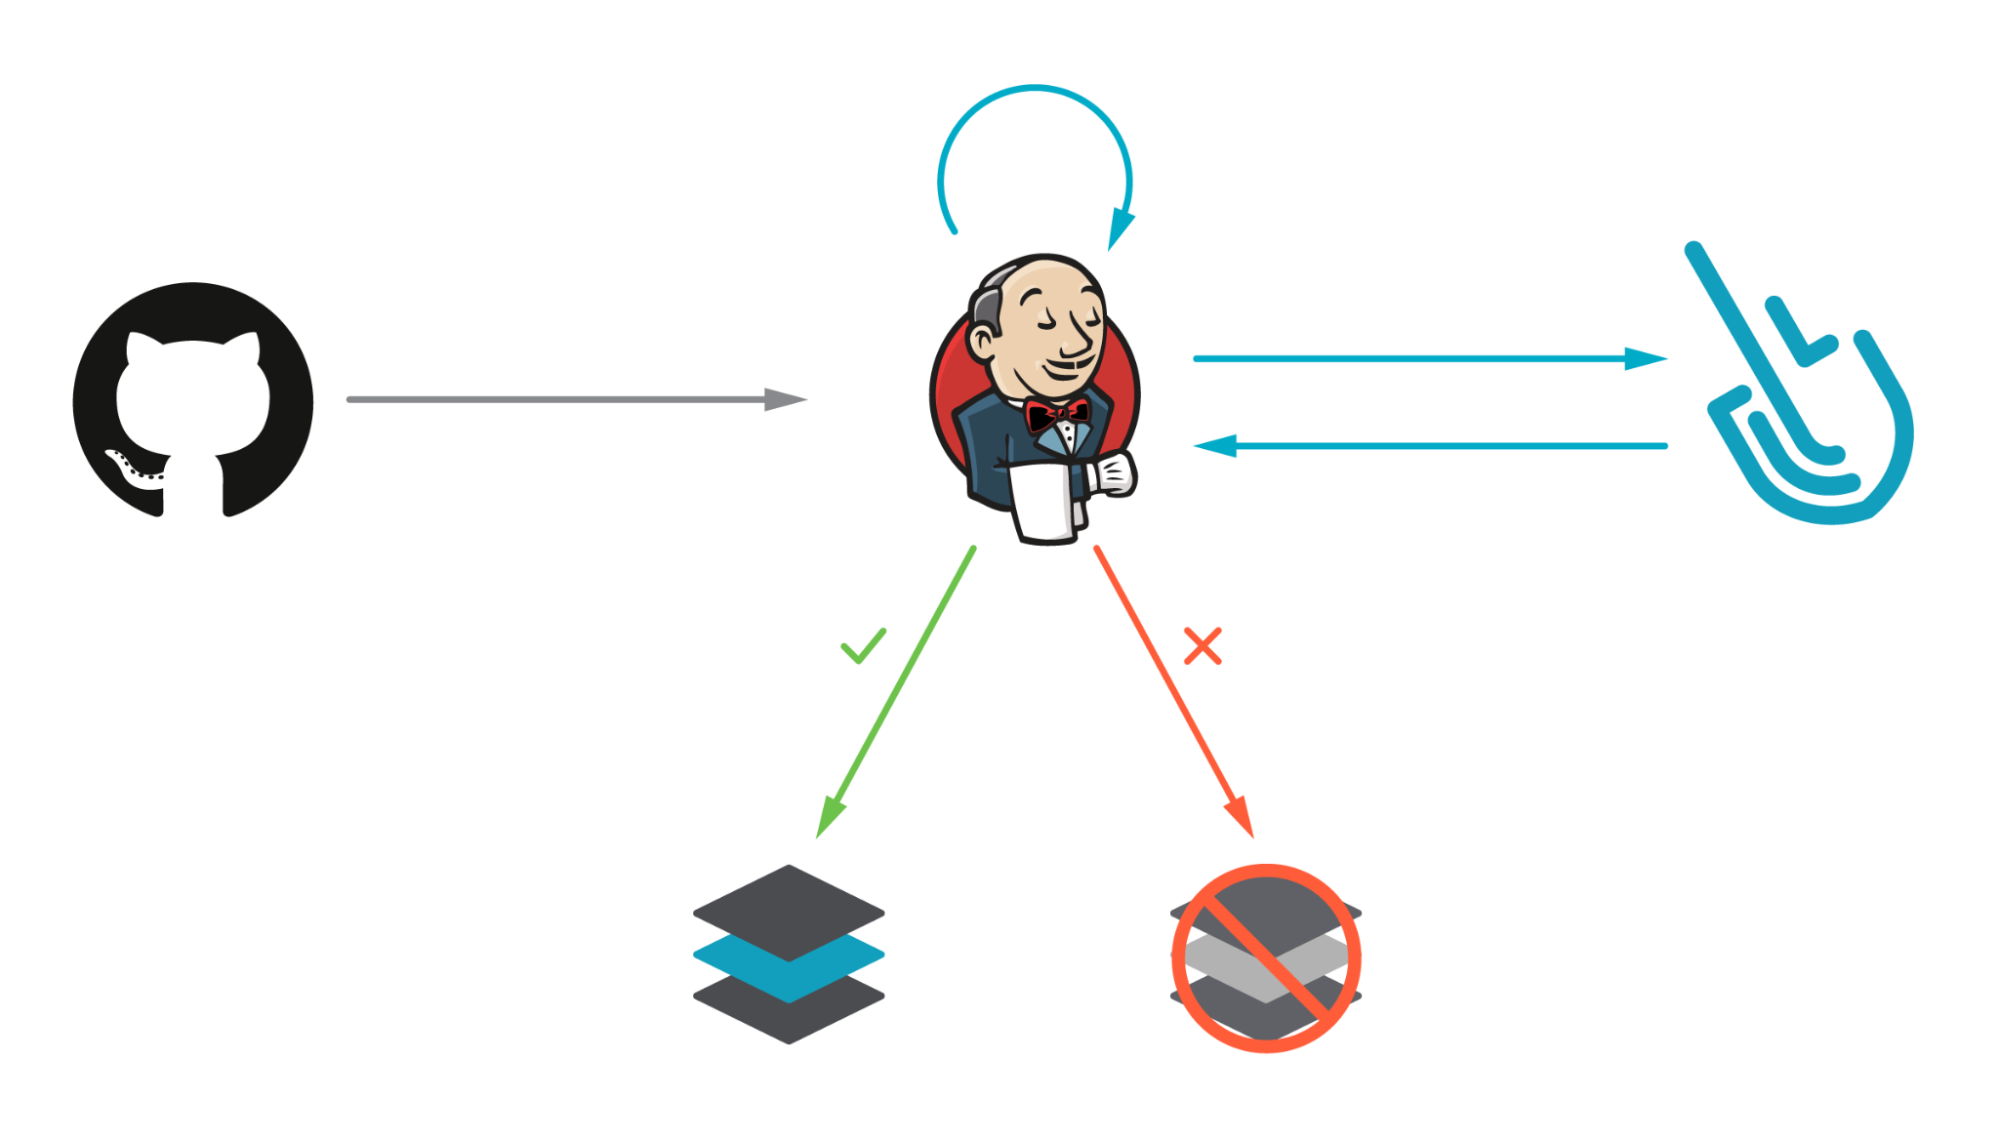
Image scanning has become a critical step in CI/CD workflows by introducing security earlier in the development process (security shift-left). Our workflow will build a container image where the definition is stored in a GitHub repository, then it will locally scan the image using the Sysdig Secure Jenkins plugin. The scan results will then be sent to Sysdig. If the scan fails, the workflow breaks, preventing the image from being uploaded into a registry.
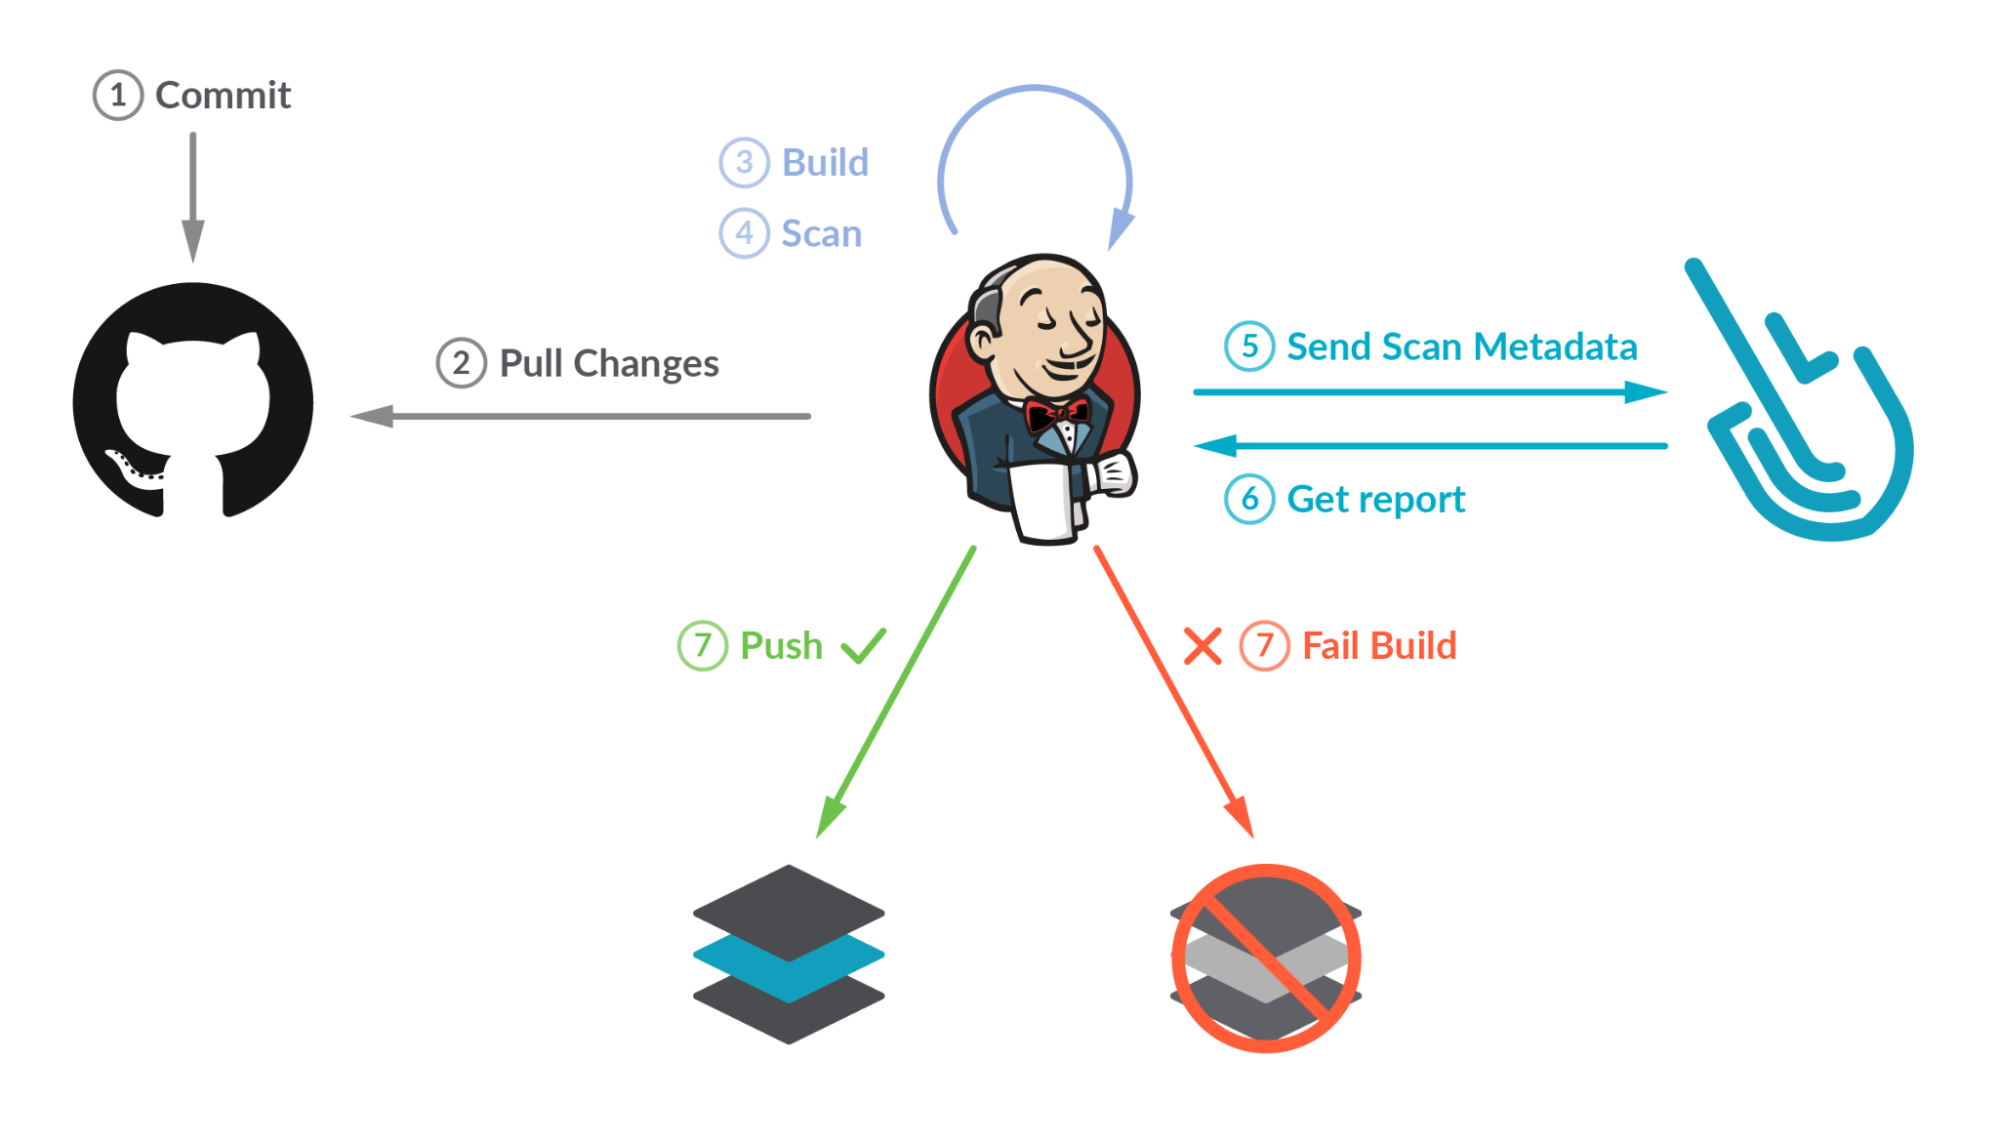
Scanning container images with Sysdig Secure Jenkins plugin
The Sysdig Secure Jenkins plugin version used in this example is the 2.2.5 with the new scanning engine. If you’re using the legacy scanner, see the official documentation and the README-legacy.md file in the Sysdig Secure Jenkins plugin GitHub repository .
Prerequisites
The requirements for getting Sysdig Image Scanning up and running are straightforward:
- A Jenkins server already running (this example uses Jenkins version 2.361.2)
A quick way to run a Jenkins server for test purposes only (it uses docker-in-docker, which is not recommended from a security perspective) is to follow the Jenkins official documentation.
- A Git repository where the container image definition is stored (e.g., GitHub).
- A Sysdig Secure account where the results of the scans will be collected. You can request a free trial if you don’t have one.
- A container Dockerfile ready to be built. You can fork and use our example, but using your own container is more fun!
Once you are ready, let’s move on!
The steps performed in this example can be done also using Jenkins’ configuration as code.
Install the Sysdig Secure Jenkins plugin
The Sysdig Secure plugin is published as a Jenkins plugin and is available for installation on any Jenkins server using the Plugin Manager in the web UI through the Manage Jenkins > Manage Plugins view, available to administrators of a Jenkins environment.
Credentials
For sensitive data, such as the registry password or the API token, it is recommended to create credentials using the Manage Jenkins > Manage Credentials view, available to administrators of a Jenkins environment.
In this example, we will use two credentials:
- sysdig-secure-api-token: The Sysdig API token is required to query the Sysdig API and to send the scan results. See the official documentation for more information on how to get it.
- registry-credentials: To store the username and password (or access token) used to push images into the container registry.
Set up an image scanning pipeline on Jenkins
Jenkins has a few different ways to express the automation, including using the basic “Freestyle Project” (where you define the different steps in the UI) or using Jenkins pipelines. Pipelines are expressed as groovy code stored in aJenkinsfile file. There are also two different pipeline syntax, “declarative” or “scripted”, and they can be coded into the UI directly or stored in the code repository with the application code itself for easy consumption.
Pipelines can be parametrized and as complex as needed, but the example workflow used in this blog post (stored in the sysdiglabs/secure-inline-scan-examples repository) is a simple version on what can be achieved with Jenkins pipelines.
To create the pipeline, select the “New Item” -> “Pipeline” buttons and type the name of your pipeline. Then, paste the Jenkinsfile content on the “Pipeline” text box.
Let’s see the pipeline definition step by step.
pipeline {
  environment {
    image = "docker.io/edusysdig/myawesomeimage" + ":$BUILD_NUMBER"
    registryCredential = "registry-credentials"
    repository = 'https://github.com/sysdiglabs/secure-inline-scan-examples.git'
    SYSDIG_API_TOKEN_CRED = credentials('sysdig-secure-api-token')
    api_endpoint = 'https://eu1.app.sysdig.com'
    myimage = ''
  }
  agent any
Code language: JavaScript (javascript)
Those first lines are intended to define the pipeline environment variables:
- The
imagevariable stores the full image path (including the registry"docker.io/edusysdig/myawesomeimage") as well as the tag (":$BUILD_NUMBER"). TheBUILD_NUMBERvariable (representing the build ID in Jenkins) is used as a trick to have different images built on different runs. - The
registryCredentialvariable points to the"registry-credentials"credential Jenkins object that contains the registry credentials created earlier. repositorystores the URL where our container image is stored ('https://github.com/sysdiglabs/secure-inline-scan-examples.git').- The
SYSDIG_API_TOKEN_CREDstores the content of thesysdig-secure-api-token credentialcreated earlier. api_endpointstores the appropriate Sysdig vulnerability scanning endpoint depending on your region, see the official documentation.myimageis an empty (for now) global variable that will be used later in the pipeline. It is defined here to be common to all the steps.
The agent section specifies where the pipeline (or just a specific stage) will be executed.
Then, the pipeline is defined on stages that contains single or multiple steps:
  stages {
    stage('Cloning Git') {
      steps {
        git branch: 'main', url: repository
      }
    }
Code language: JavaScript (javascript)
The first stage is to get the repository content using the git function, where we specify the branch and the repository URL (stored in the repository environment variable).
    stage('Building image') {
      steps{
        script {
          myimage = docker.build(image, "./jenkins/new-scan-engine/")
        }
      }
    }
Code language: JavaScript (javascript)
The second stage leverages the Docker pipeline plugin to build the container image. The docker.build function receives the image argument to name the container image being built, as well as the context where the docker build operation will be performed (in this case the "./jenkins/new-scan-engine/" folder of the repo that also contains theDockerfile file). The myimage result will be pushed to the container registry if the scan finishes successfully.
In this case, we used script to switch to a scripted pipeline section, leveraging the myimage variable later in the pipeline.
    stage('Scanning Image') {
        steps {
            sysdigImageScan engineCredentialsId: 'sysdig-secure-api-token', imageName: "docker://" + image, engineURL: api_endpoint
        }
    }
Code language: JavaScript (javascript)
This is the stage where the Sysdig Secure Jenkins plugin came into action. It is as easy as it looks! Just specify the credentials, the image, and an optional Sysdig Secure URL. Then you are good to go!
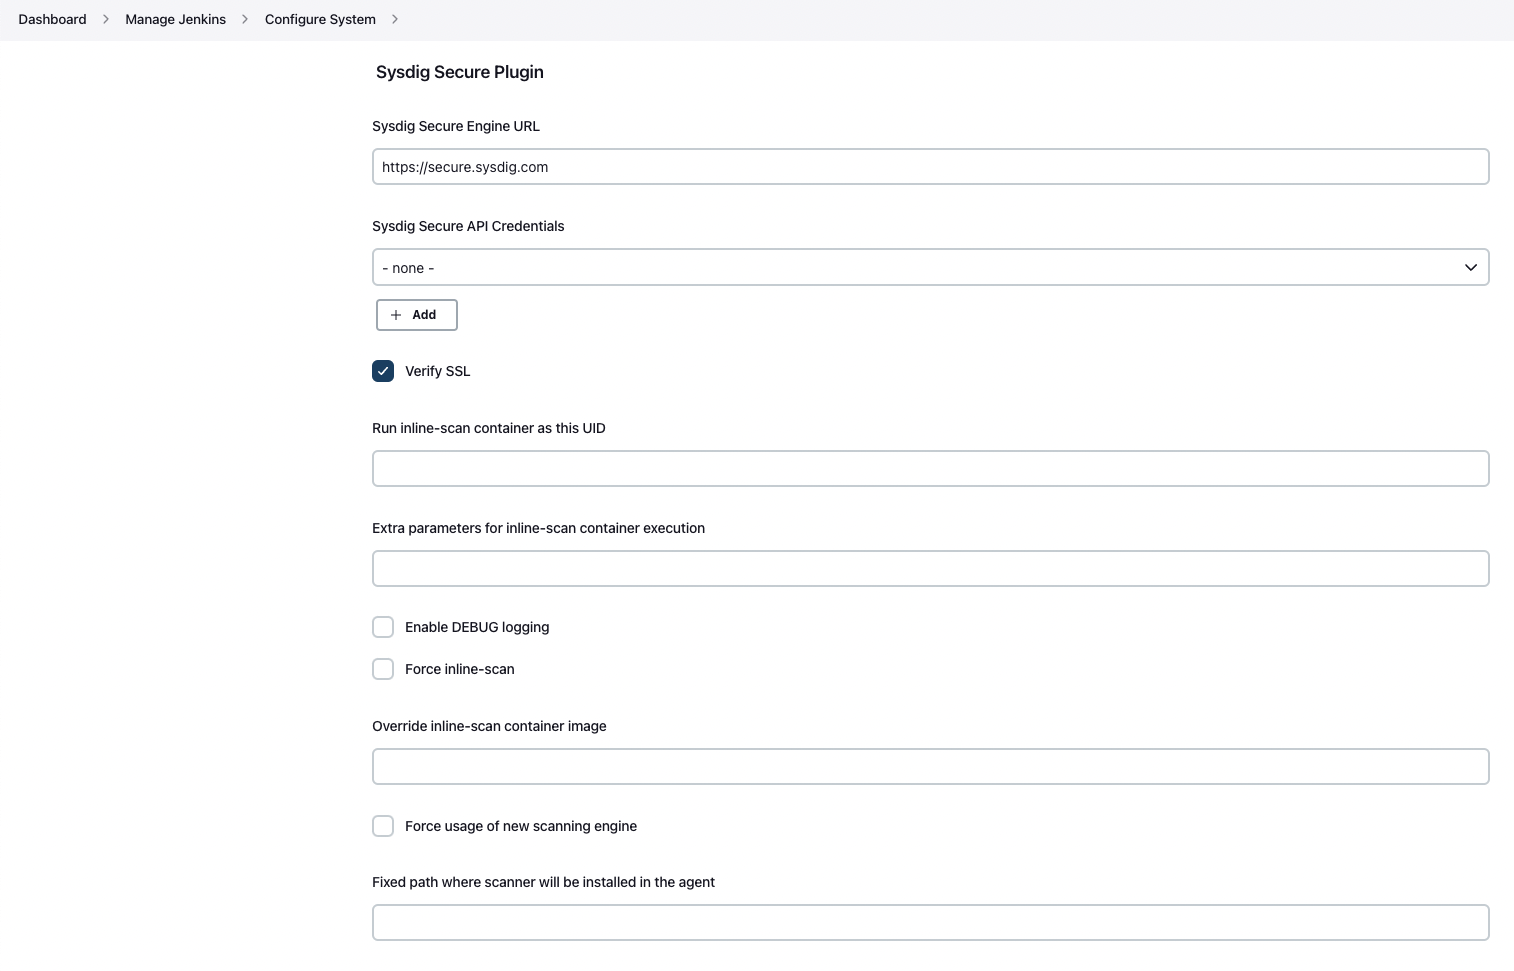
There are a few other parameters in the official documentation that can be specified, such as the ability to allow the pipeline to progress even if the scan found vulnerabilities (bailOnFail). Those parameters can also be specified globally, configuring the plugin directly in the “Manage Jenkins” -> “Configure System” section:
Finally, the last step:
    stage('Deploy Image') {
      steps{
        script {
          docker.withRegistry('', registryCredential) {
            myimage.push()
            myimage.push('latest')
          }
        }
      }
    }
  }
}
Code language: JavaScript (javascript)
The last stage is intended to push the container image to the registry after the scan finishes successfully (if it is). The docker.withRegistry function receives two arguments: the registry where the image is going to be pushed to (in this case, we use the default docker.io registry so that’s why the content is empty) and the credentials used to push the image to the container registry.
Finally, the image is pushed twice: the first time with the image:tag we provided, and the second with the 'latest' tag (hint: it is just pushed once, the second push just tags it in the repo).
Image scanning on Jenkins: Lights, camera, action!
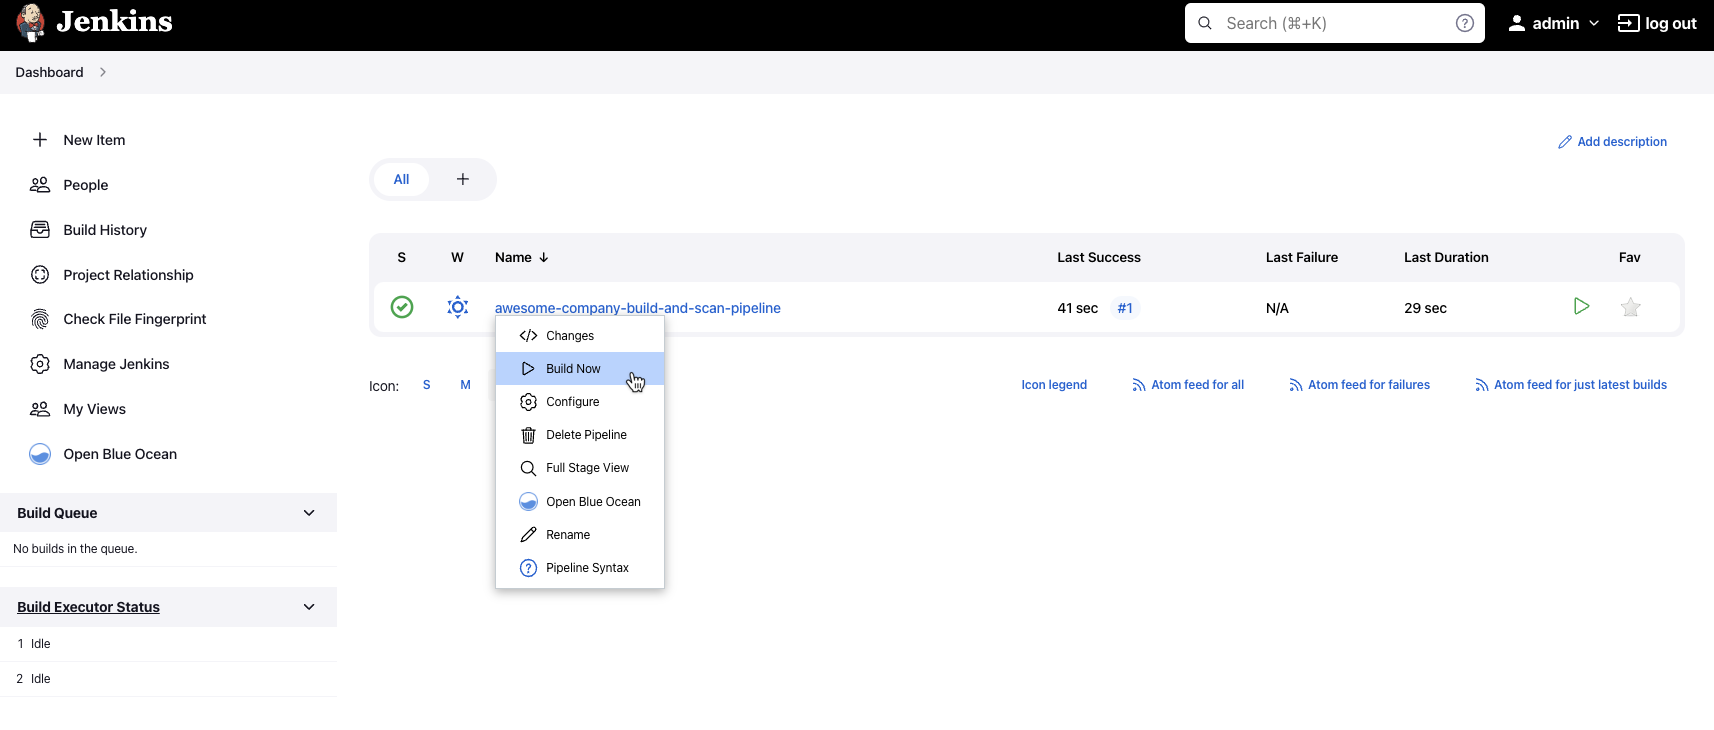
Once everything is in place, let’s run the pipeline by selecting the ‘Build Now’ button:
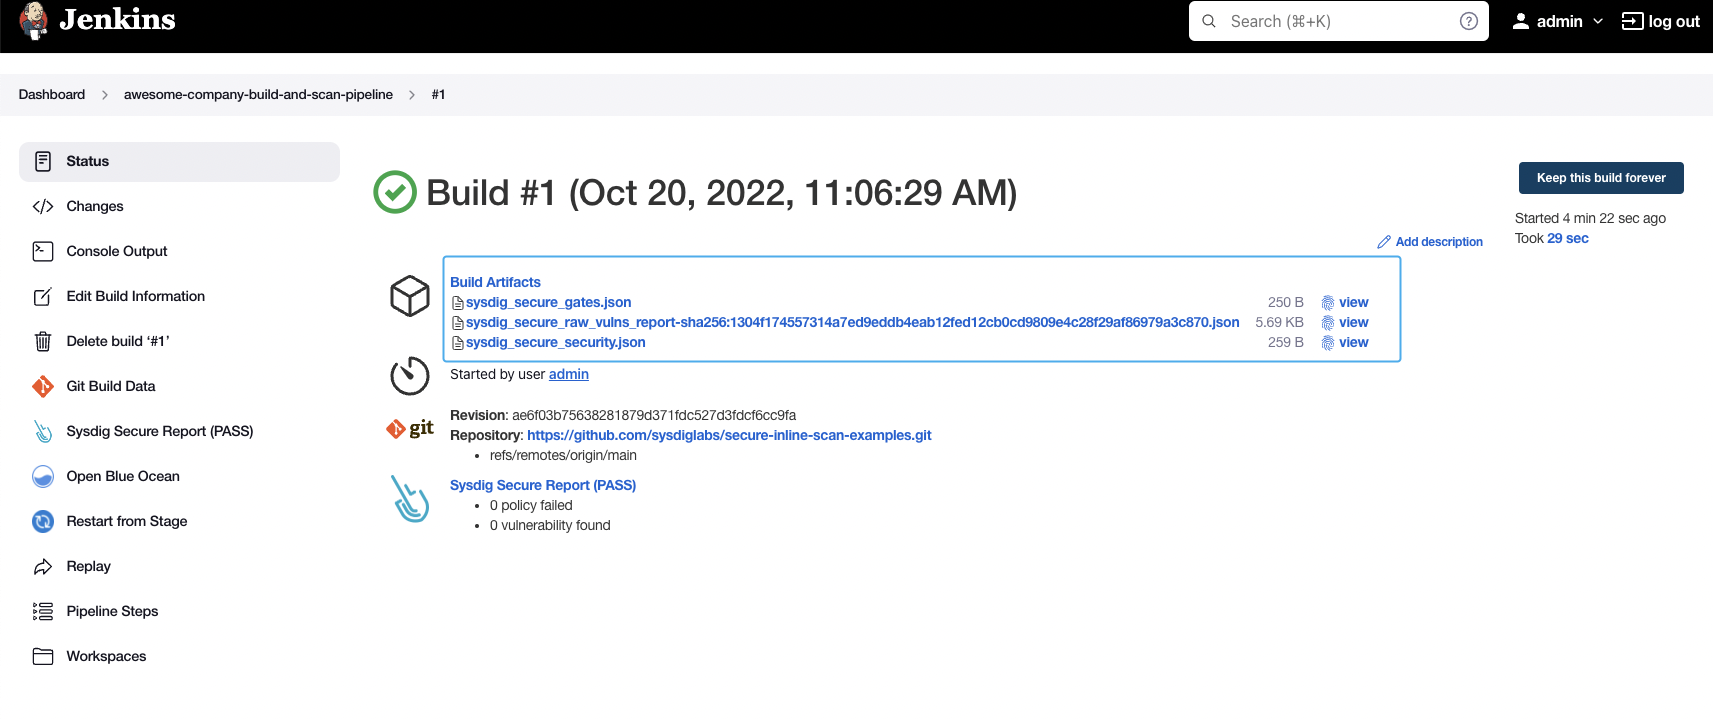
If everything went well, the pipeline finishes successfully and all the steps are green:
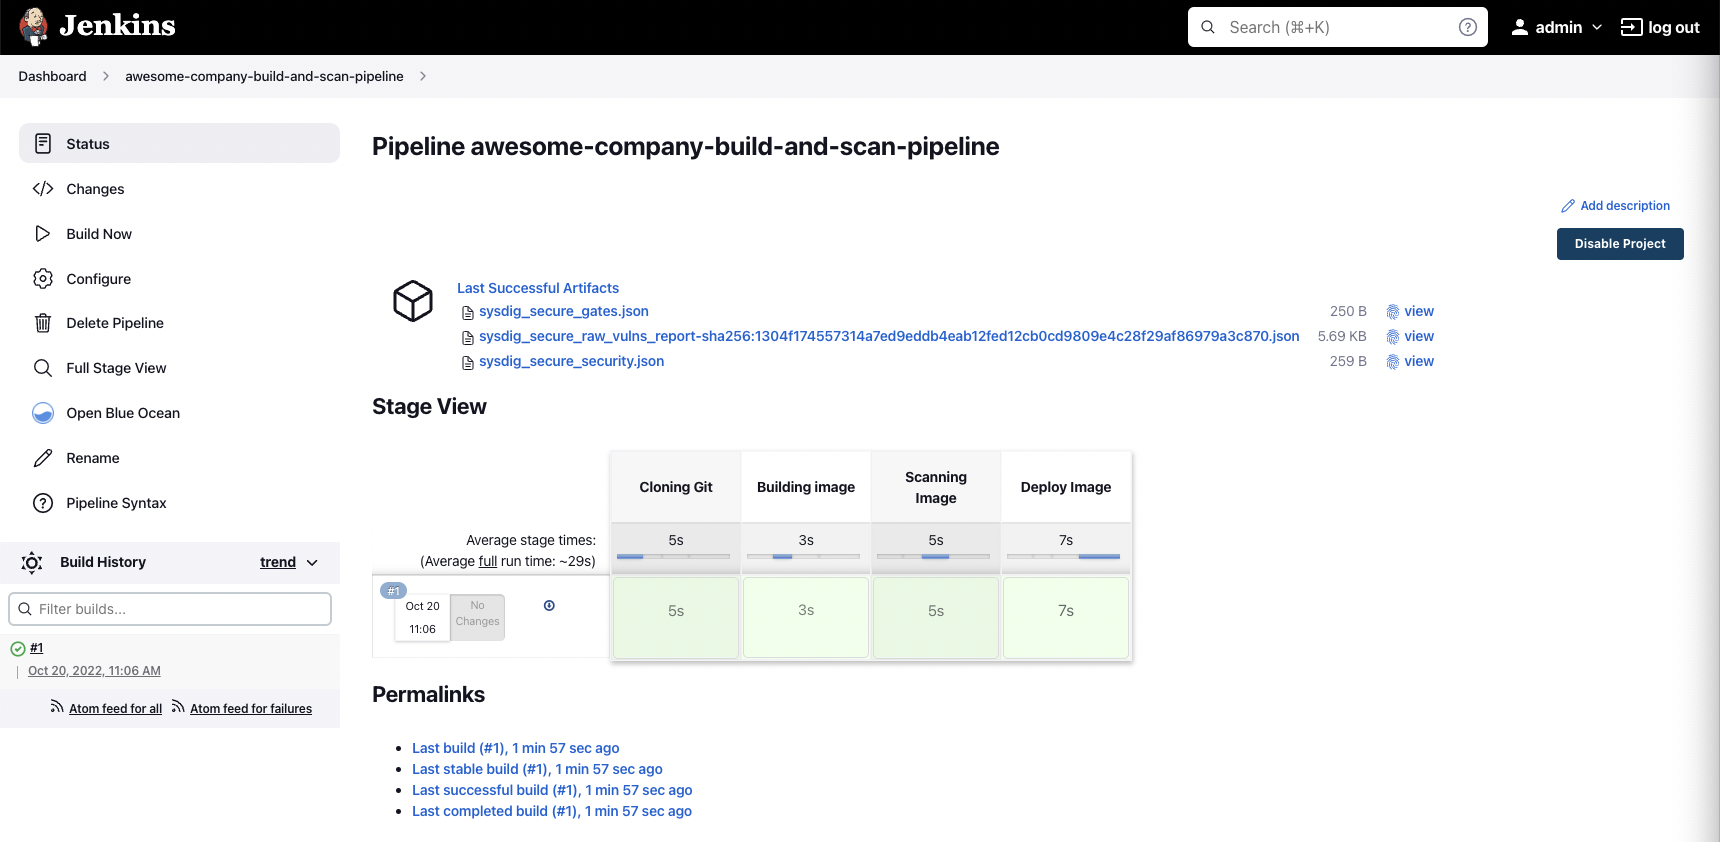
On every run, the Sysdig Secure Jenkins plugin generates some JSON files to describe the output of the execution:
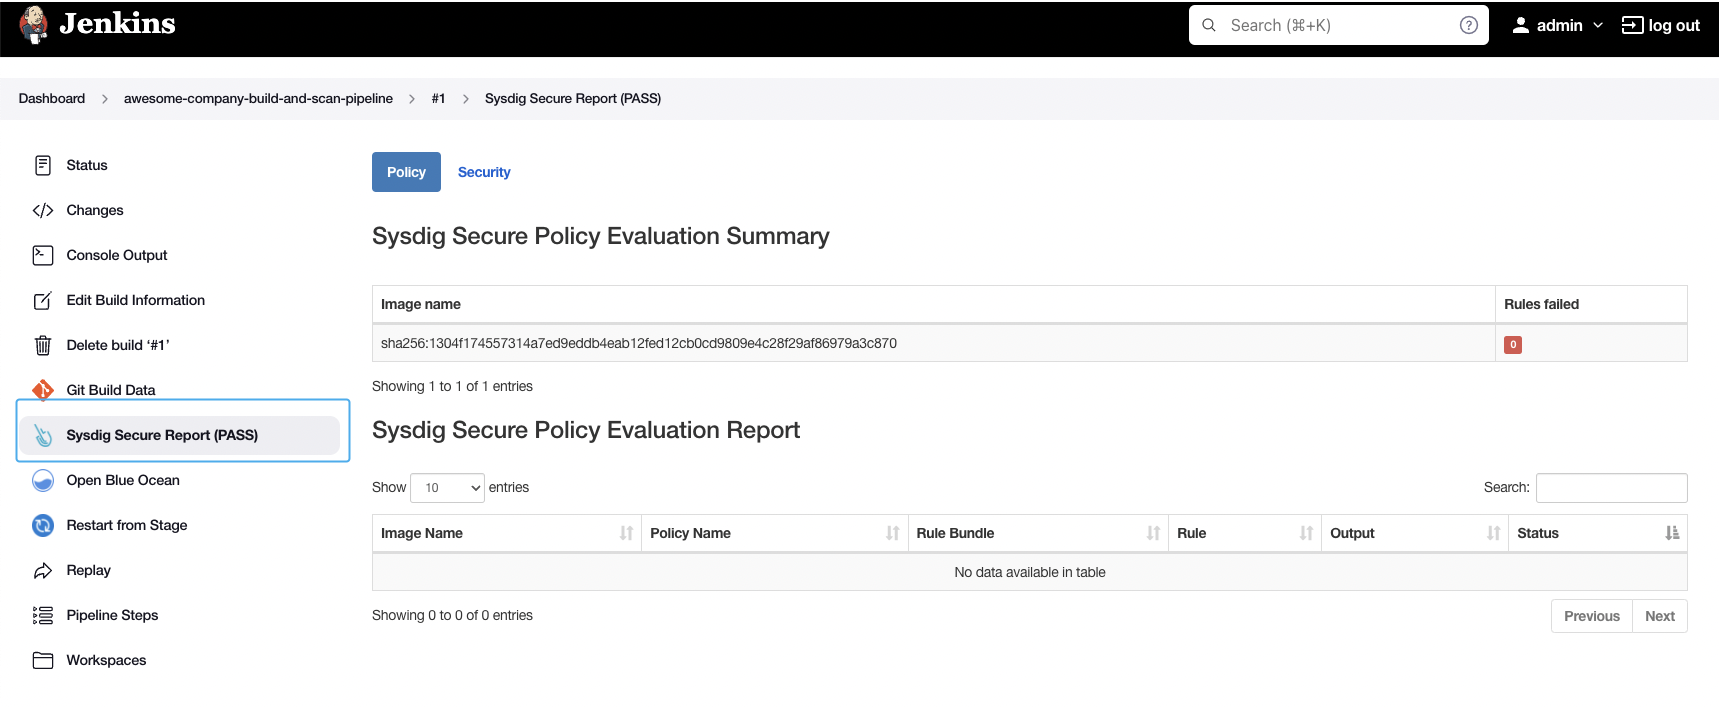
As well as a summary on the “Sysdig Secure Report” section:
You can also observe the logs in the “Console Output” section:

The analysis results are posted to your Sysdig Secure account under Vulnerability -> Pipeline:

Success! No vulnerabilities were found and the image has been published by pushing it to the registry.
This example scan used the default “Sysdig Best Practices” policy (you can see it on the logs), but you can create and customize the policies you want to check against. See the official documentation to learn more about how to create and customize policies, including not just vulnerability policies, but also image best practices.
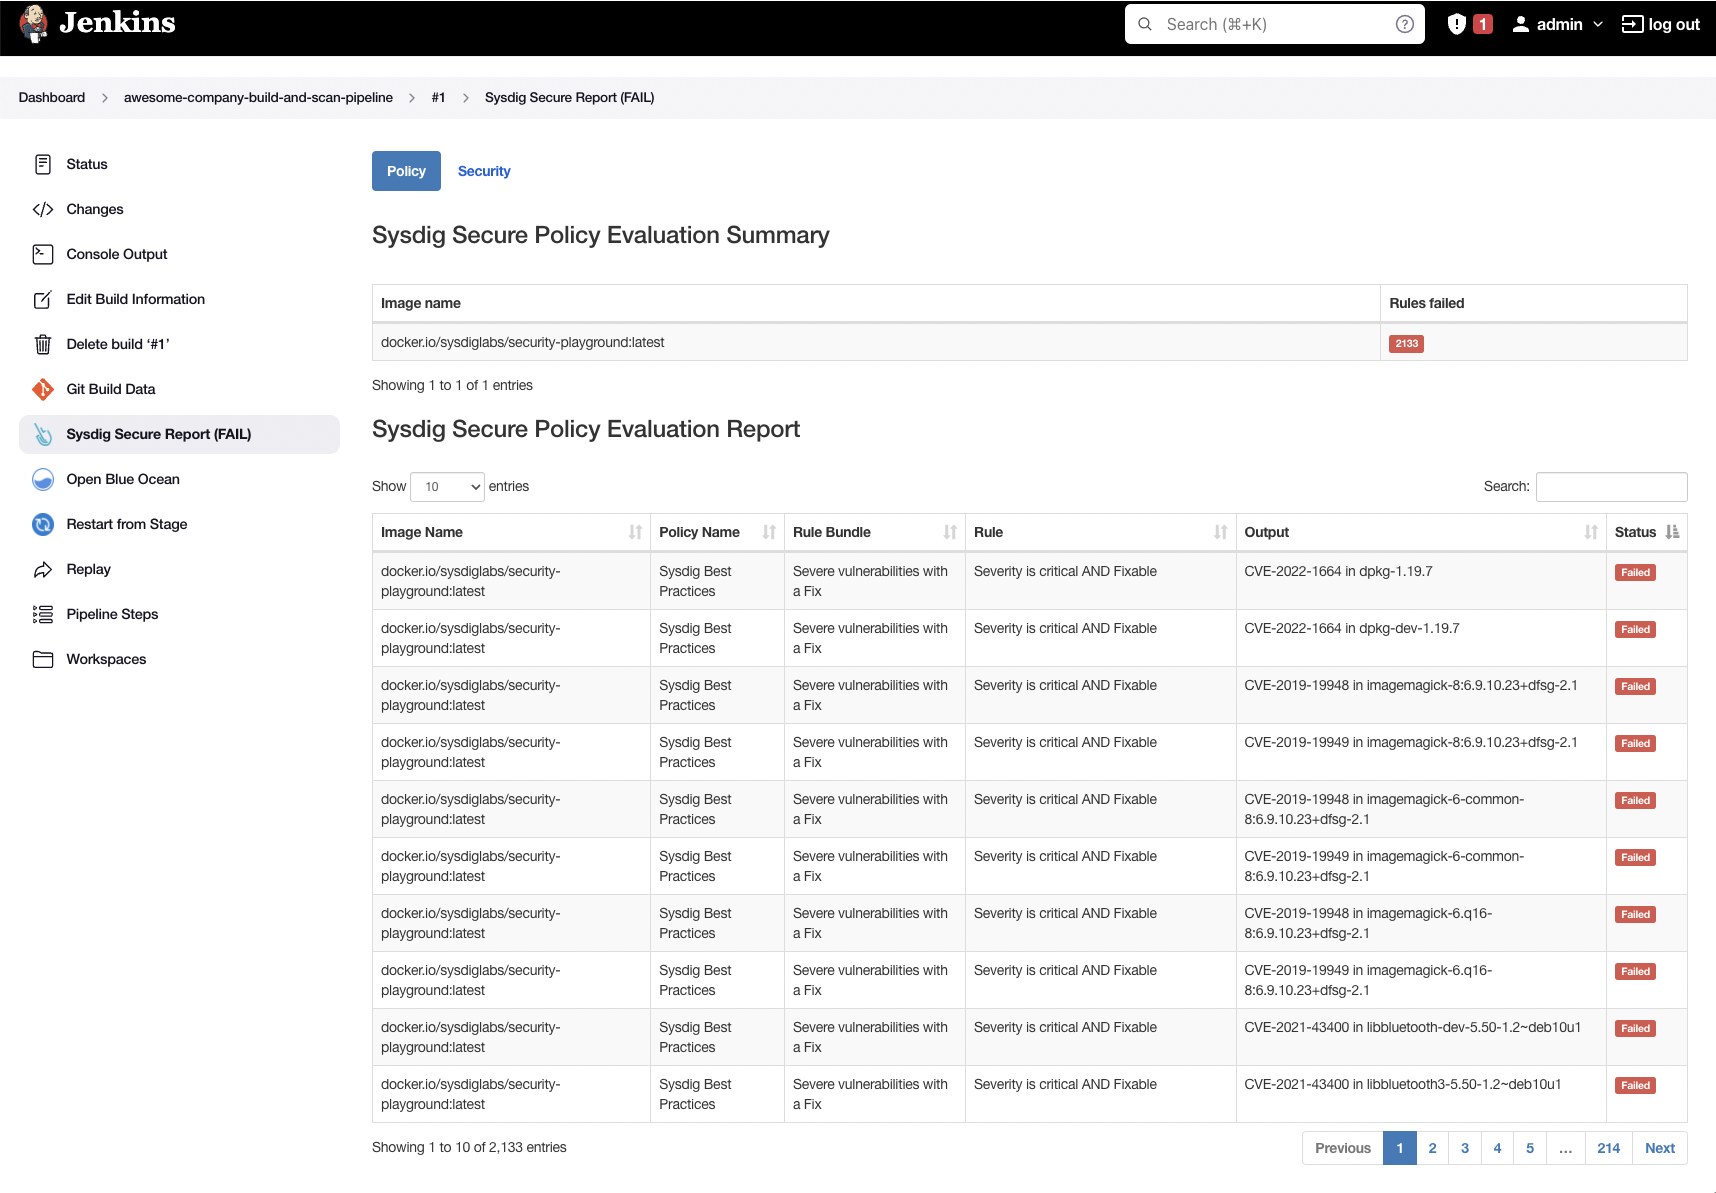
If the scan process wasn’t successful because a policy failed, the workflow stops and the image is not pushed to the registry (which is a good idea), as you can see here:

There weren’t any vulnerabilities found in this example (yay!), but if we look at another application, such as https://github.com/sysdiglabs/security-playground, we can see the details in the Jenkins UI directly:
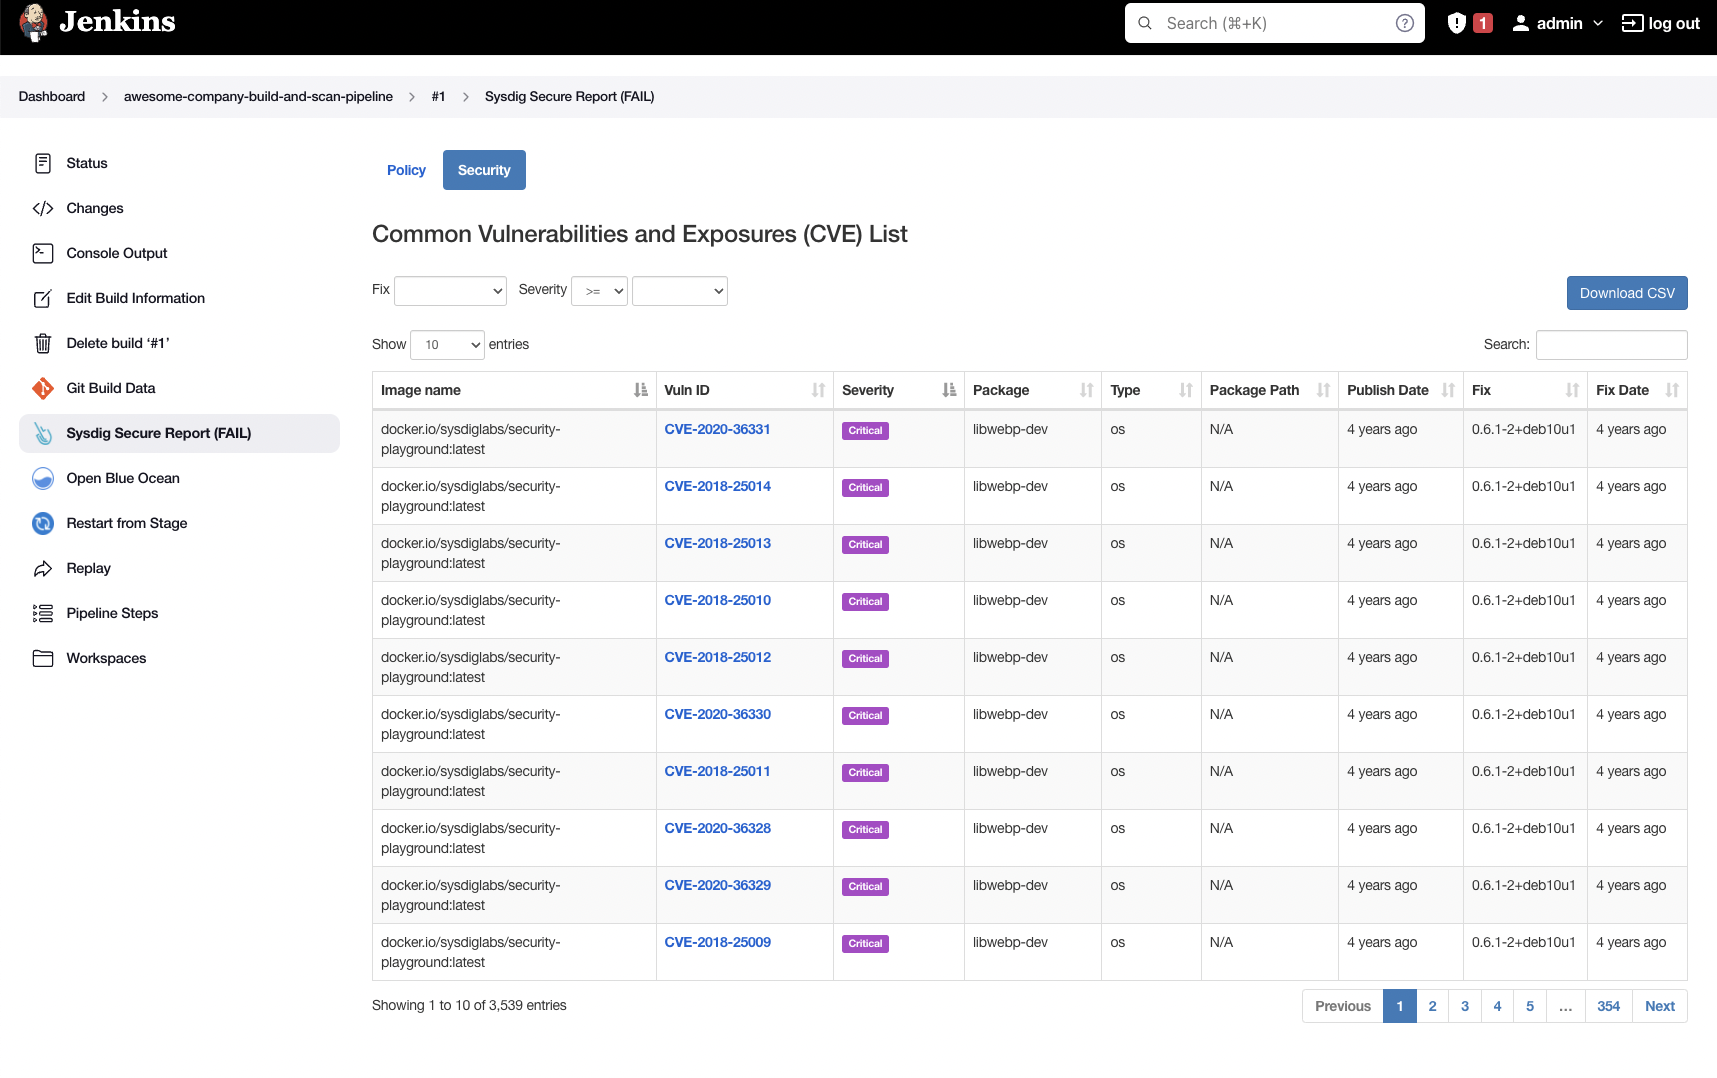
And the Sysdig UI shows those as well:
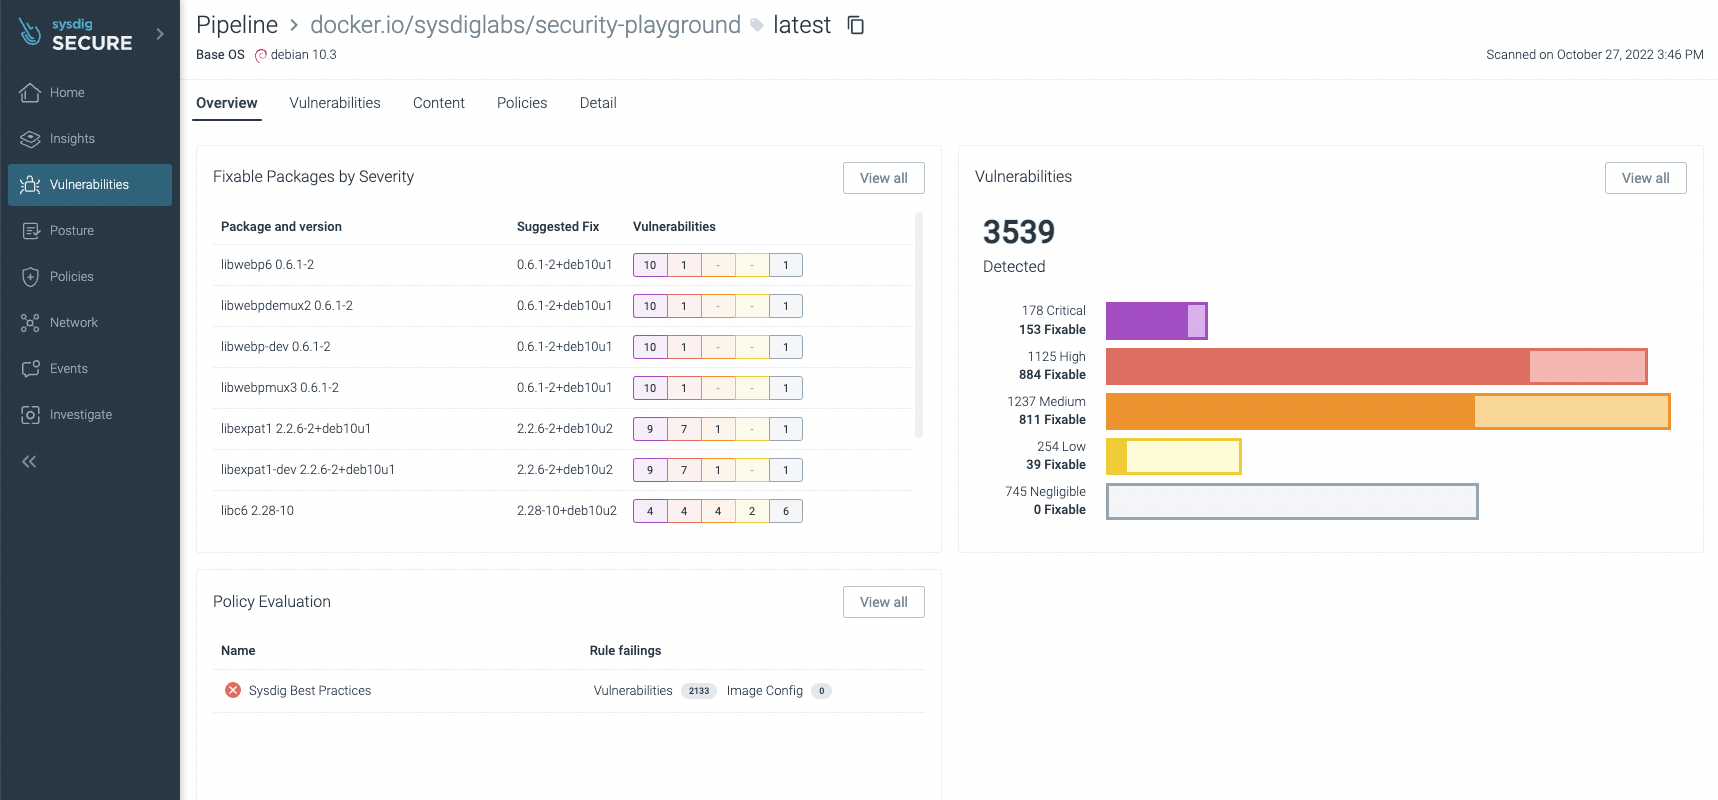
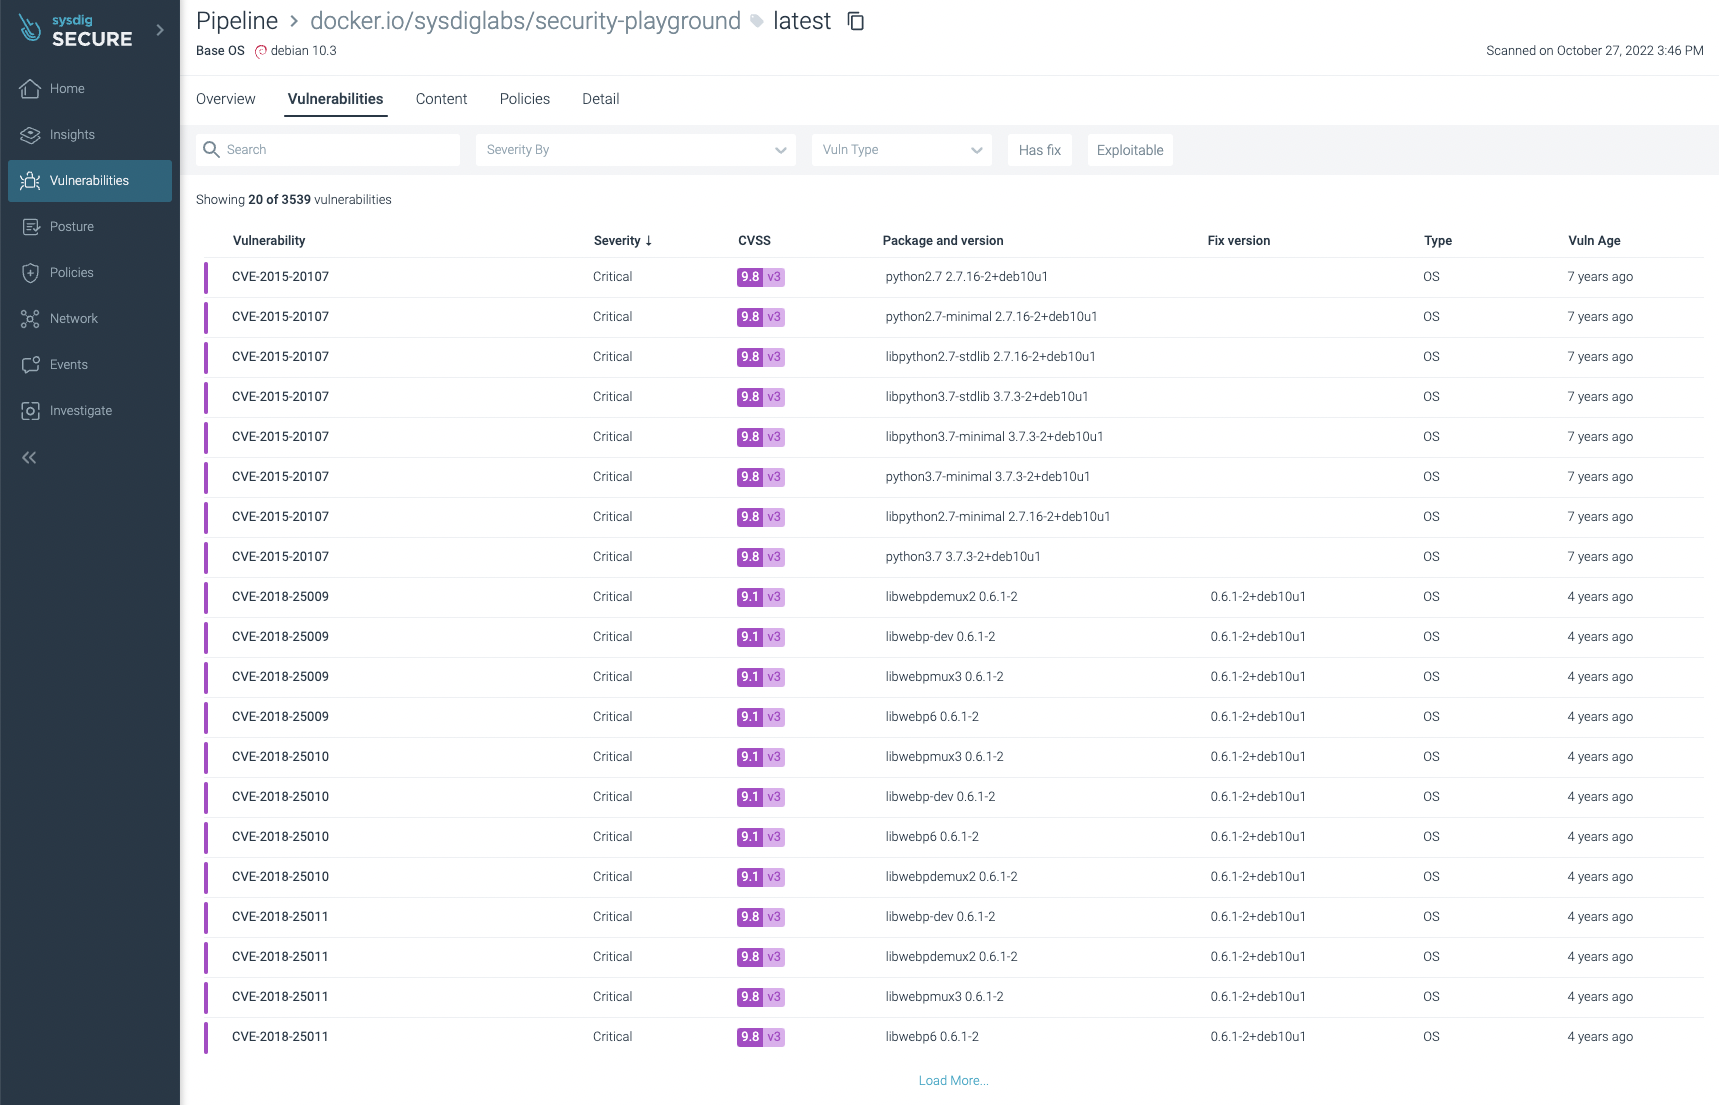
You can filter the ones that have fixes already and/or are exploitable, focusing on the most urgent ones to fix or update:

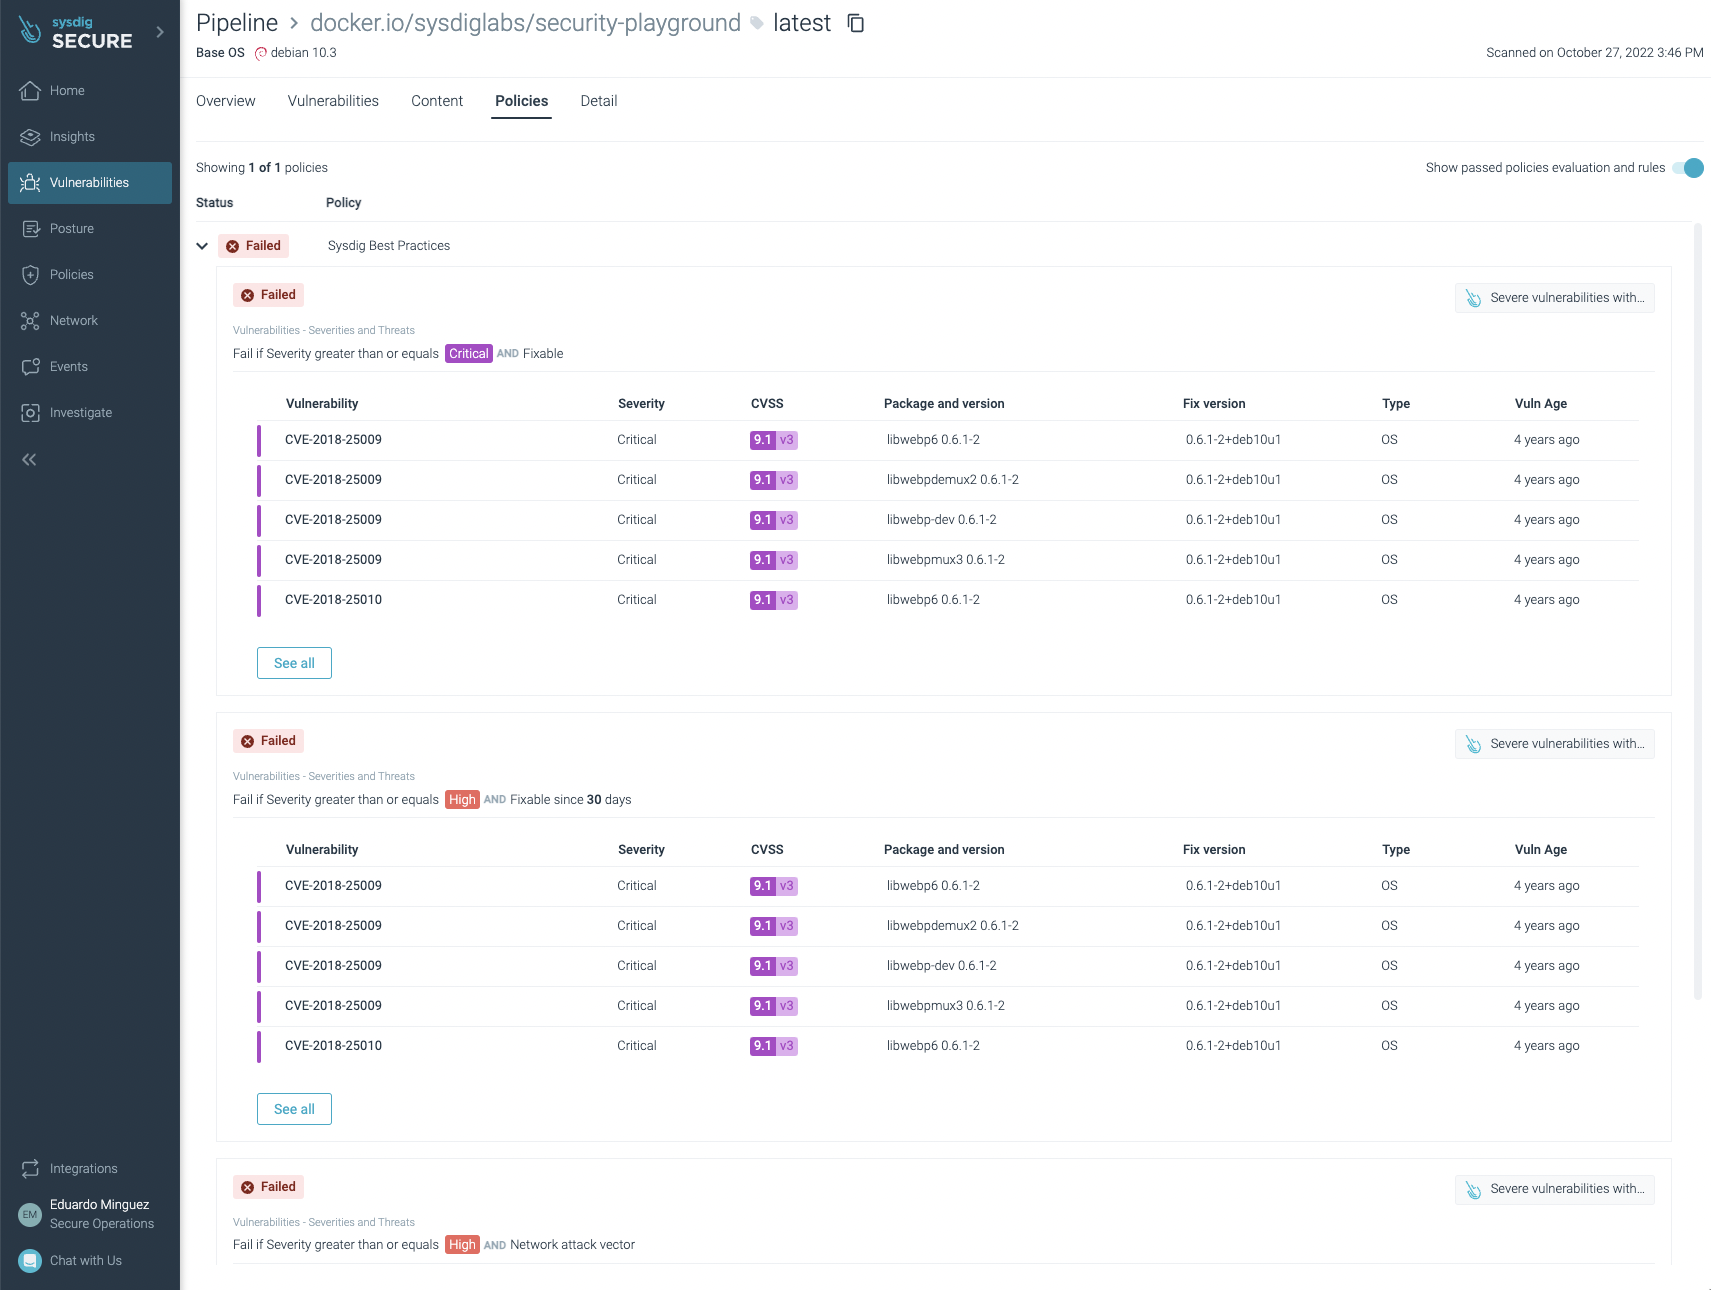
You can not only see vulnerabilities, but also some not best practices:
Automating the execution via triggers
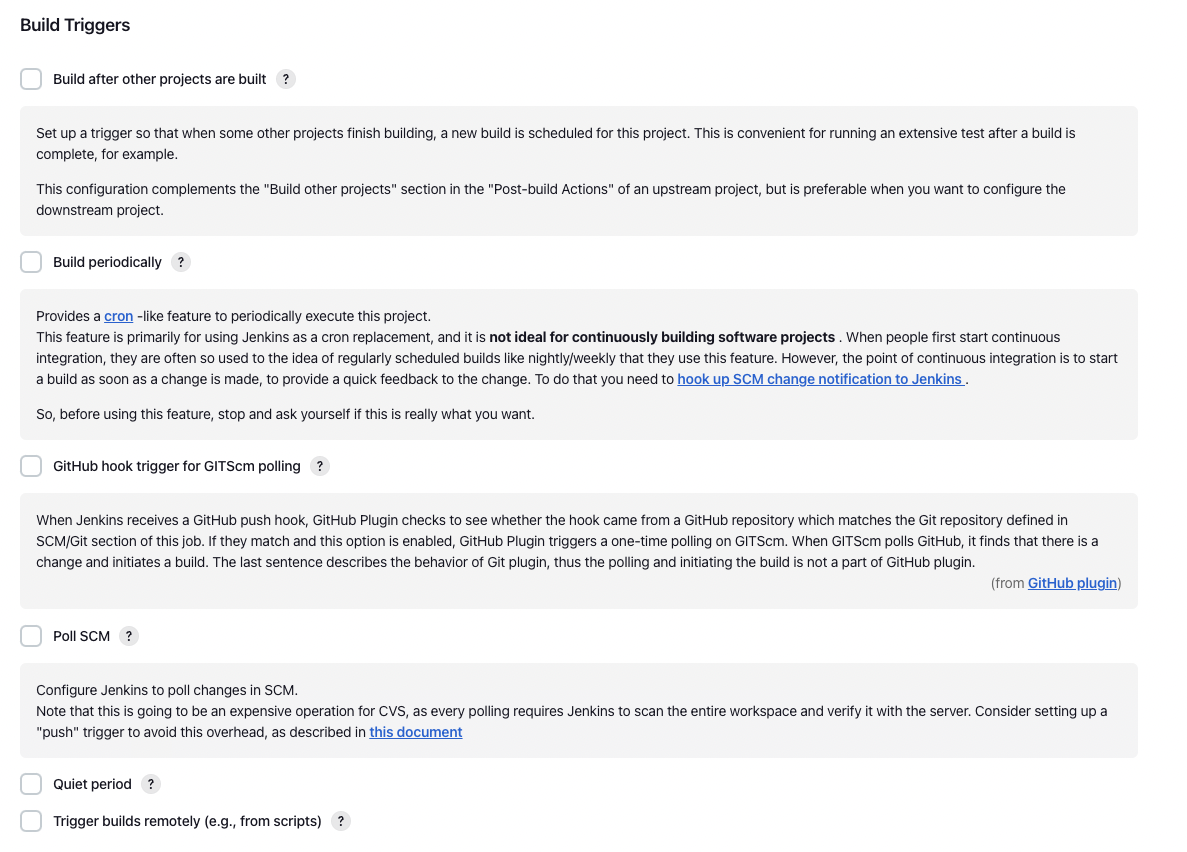
We didn’t cover how to run the pipeline automatically on every repository change. This is a slightly more advanced topic as there are different approaches depending on your particular needs, including pooling the repository every X minutes or configuring webhooks so when a change happens, Jenkins is notified. You can read more about it in the following screenshot:
Conclusions
As you can see, Jenkins pipelines are a powerful tool to automate your CI/CD. Now, it is easy and straightforward to include Sysdig Secure Inline Scan in your workflow, scanning images for vulnerabilities, enforcing best practices at build time, and providing several benefits over traditional image scanning within the registry:
- Implementing image scanning in the CI/CD pipeline means that if vulnerabilities are found, you prevent the image from being published at all.
- As analysis is performed inline (locally) in the runner and the image is not sent anywhere else, including outside of the environment in which it’s built. During the analysis, only metadata information, and not the actual contents, is extracted from the image.
- The metadata obtained from the analysis can be reevaluated later if new vulnerabilities are discovered or policies are modified without requiring a new scanning of the image for alerting. If you want to break the build, you still need to trigger a new scan within the build.
- Sysdig Secure provides out-of-the-box policies to enforce and adhere to various container compliance standards (like NIST 800-190 and PCI).
Sysdig Secure image scanning can be integrated seamlessly with most CI/CD pipeline tools.
If you are not yet using Sysdig Secure for scanning your images, wait no longer and request a demo now!