
AWS CloudFormation provides an easy way to model and set up AWS resources to help you save time in deploying the stack you need to run your applications. Today, AWS announced the launch of AWS CloudFormation Public Registry. CloudFormation Public Registry is a searchable collection of extensions that allows you to easily discover, provision, and manage resource types and modules published and maintained by AWS Partner Network (APN) partners like Sysdig.
With this co-launch between Sysdig and CloudFormation Public Registry, you can now easily discover our published resource types, eliminating the need to build and maintain these resources types yourself. Collaborating with AWS, we’ve built a new CloudFormation extension that’s available in the new CloudFormation Public Registry. The Sysdig extension automates the deployment of the Sysdig agent to your Amazon Elastic Kubernetes Service (EKS) clusters. With it, you can quickly and securely install at scale with a single operation via the api/cli/web console.
In this article, we’ll highlight how the CloudFormation Public Registry works and how to take advantage of the published Sysdig extension.
Using CloudFormation to adopt Infrastructure as Code
CloudFormation provides a declaration of the resources that make up a stack to be deployed on the AWS cloud. By treating infrastructure as code you can model, provision, and manage a collection of AWS and third-party resources throughout their lifecycles. The CloudFormation public registry includes extensions published by Amazon, as well as third parties. The extensions are available for use by all CloudFormation users.
CloudFormation also provides useful features such as Drift Detection. Drift detection allows you to identify when resources in your stack deviate from the expected template configuration and provides information about the drift status for each third-party resource type.
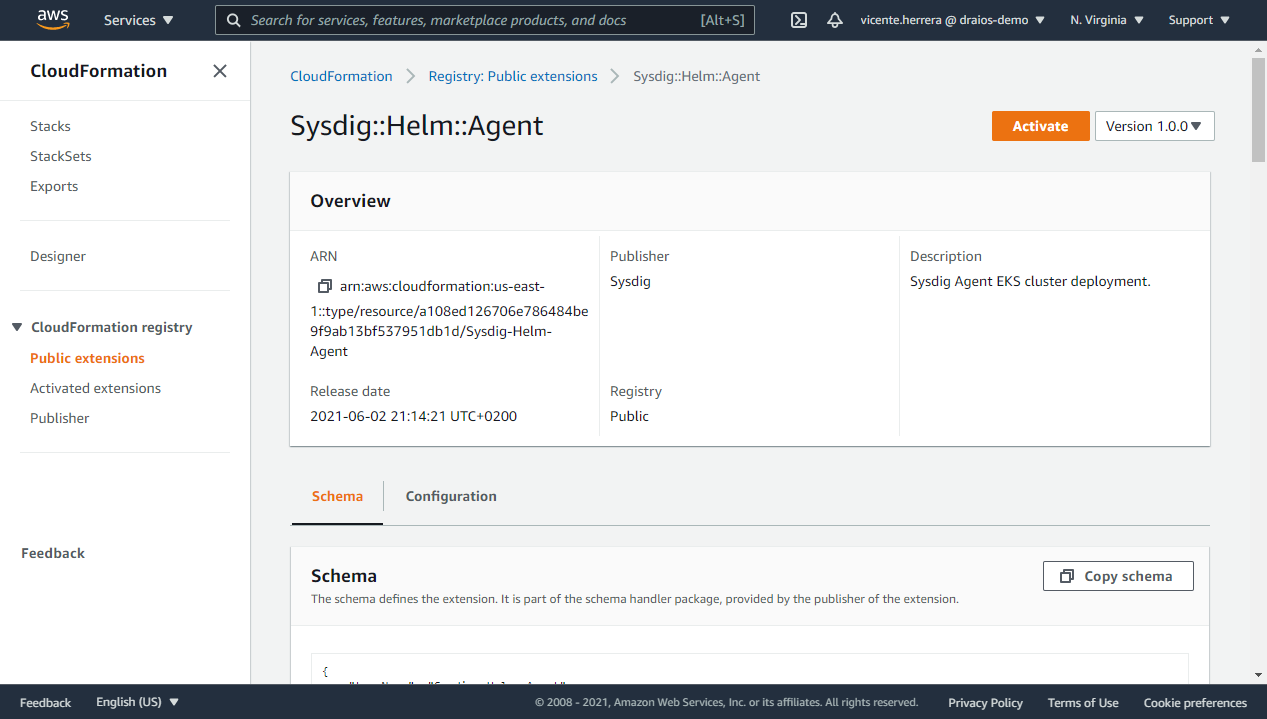
To get started with CloudFormation extensions, in the CloudFormation console navigation pane under CloudFormation registry, select the extension you want to use. Here, for instance, you’ll find the new Sysdig extension.


How to use the Sysdig agent CloudFormation extension
The Sysdig CloudFormation extension is available to any user that wishes to use it. As noted above, this particular extension will automate the deployment of the Sysdig agent to your EKS clusters.
Note that while the module is public and free to use, you will need a Sysdig API Token to link the installation to your Sysdig account. If you’re not already a Sysdig, you can create a Sysdig free trial account following this link.
To use a public extension in your template, first enable it for the account and region in which you want to use it. This makes the extension usable in stack operations in the account and region in which it is enabled.
When you enable the extension, CloudFormation creates an entry in your account’s extension registry as a private extension. You can then customize the extension as it is enabled in your account in the following ways:
- Specify an alias to use instead of the public third-party extension name. This can help avoid naming collisions between third-party extensions.
- Specify whether the extension is automatically updated when a new minor or patch version becomes available.
- Specify the execution role CloudFormation uses to enable the extension, as well as configure logging for the extension.
You can also set any configuration properties to define how the extension is configured for a given account and region.
The Sysdig extension is available now in the us-east-1. More regions will be added soon.
To start using it, follow these steps to create an IAM role that the integration will use, give it permissions to access the EKS cluster, and enable the module as described below.
Creating the IAM role
First we need to create an IAM execution role for the extension to use for all its activity. To do so, visit the IAM section of the AWS console website, click on Roles in the lateral menu, and click on the “Create role” button.
Then select AWS service, and on the Common use cases section, EC2, and click the “Next: Permissions” button.

On the next screen, on the “Permissions policy”, click on create policy. A new browser tab will open with a “Create Policy” screen, click on “JSON”, and use the following policy definition:
{
    "Version": "2012-10-17",
    "Statement": [
        {
            "Action": [
                "iam:PassRole",
                "eks:CreateCluster",
                "ec2:DeleteNetworkInterface",
                "eks:DescribeCluster",
                "kms:DescribeKey",
                "ec2:DescribeNetworkInterfaces",
                "ec2:DescribeRouteTables",
                "lambda:CreateFunction",
                "ssm:DeleteParameter",
                "logs:PutLogEvents",
                "lambda:GetFunction",
                "logs:CreateLogStream",
                "secretsmanager:GetSecretValue",
                "eks:UpdateClusterVersion",
                "lambda:InvokeFunction",
                "kms:Decrypt",
                "eks:UntagResource",
                "sts:GetCallerIdentity",
                "s3:GetObject",
                "logs:CreateLogGroup",
                "ec2:CreateNetworkInterface",
                "lambda:UpdateFunctionCode",
                "lambda:DeleteFunction",
                "sts:AssumeRole",
                "cloudformation:ListExports",
                "eks:TagResource",
                "kms:CreateGrant",
                "eks:ListTagsForResource",
                "eks:DeleteCluster",
                "lambda:UpdateFunctionConfiguration",
                "ec2:DescribeVpcs",
                "ec2:DescribeSubnets",
                "eks:UpdateClusterConfig",
                "ssm:PutParameter",
                "ec2:DescribeSecurityGroups",
                "ssm:GetParameter"
            ],
            "Resource": "*",
            "Effect": "Allow"
        }
    ]
}
Click “Next: Tags”, and on the “Add tags” screen, click “Next: review”, and choose a name for the policy like “SysdigAgentPolicy”.

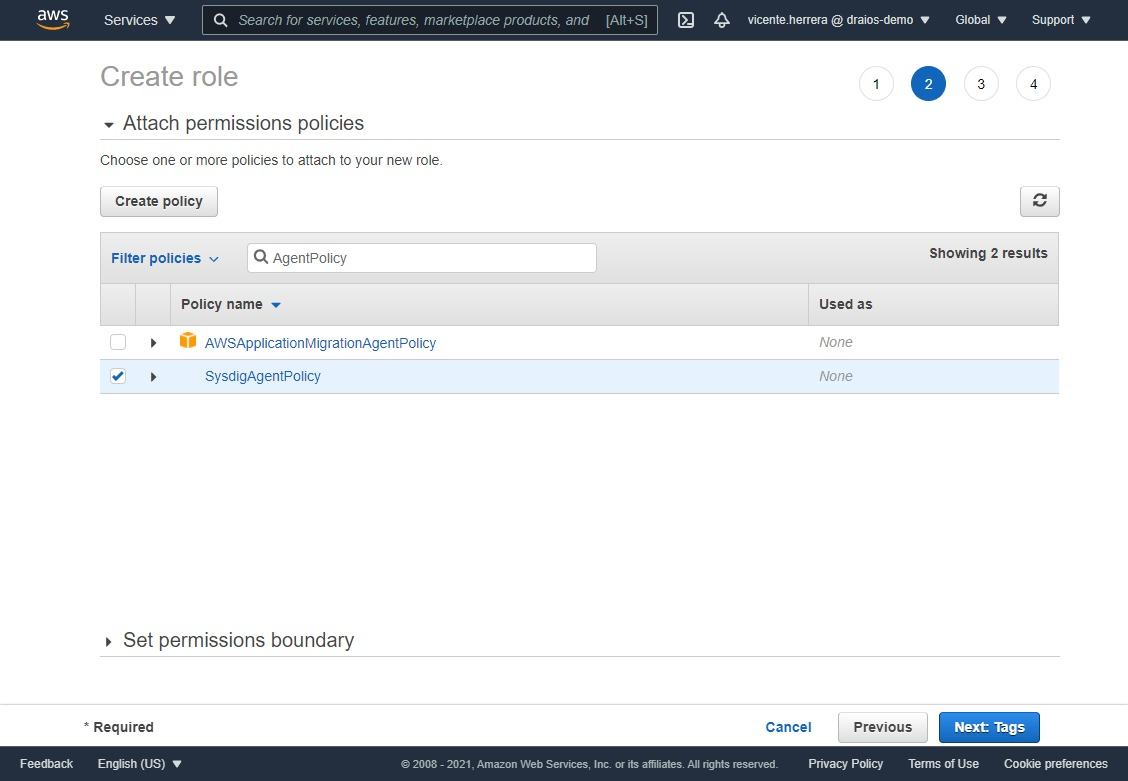
Go back to the original browser tab, click on the refresh icon at the top right corner of the policy table, then search for the “SysdigAgentPolicy” you created. Click on the checkbox at its right, and click the “Next: Tags button”.
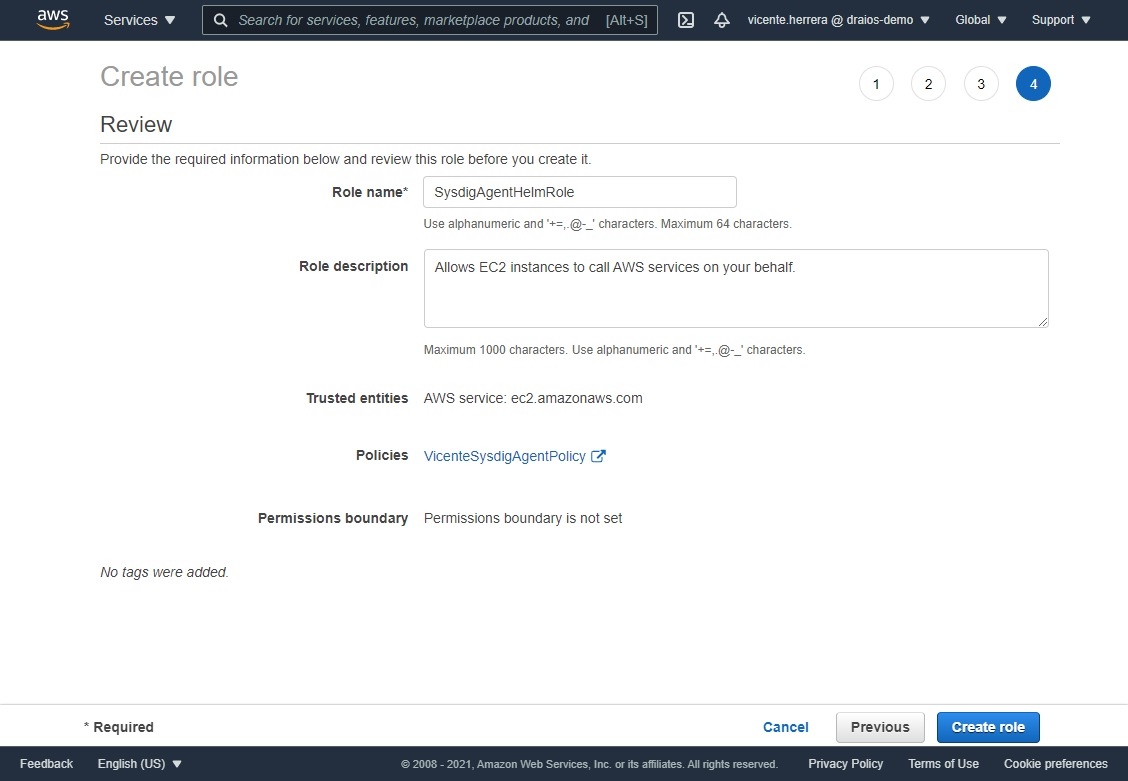
Just click on the “Next: Review” button to go to the final screen, and put a name to the role, for example “SysdigAgentHelmRole”.
Give the role access to your EKS cluster
Given how EKS handles authentication and permissions, we have to specifically grant the IAM role we created access to the EKS cluster.
First, if you don’t have an EKS cluster already created, you can create one very quickly using EKSCTL:
eksctl create cluster --name sysdig-test-cluster --region us-east-1
Once it finishes creation, we can edit the default authentication configmap to add the IAM role ARN:
kubectl edit configmap aws-auth -n kube-system
The content will be similar to this one
# Please edit the object below. Lines beginning with a '#' will be ignored,
# and an empty file will abort the edit. If an error occurs while saving this file will be
# reopened with the relevant failures.
#
apiVersion: v1
data:
  mapRoles: |
    - groups:
      - system:bootstrappers
      - system:nodes
     rolearn: arn:aws:iam::845151661675:role/eksctl-sysdig-test-cluster-n-NodeI  nstanceRole-10CJF3MXZEYI7
      username: system:node:{{EC2PrivateDNSName}}
  mapUsers: |
    []
kind: ConfigMap
metadata:
  creationTimestamp: "2021-06-20T18:26:52Z"
  name: aws-auth
  namespace: kube-system
  resourceVersion: "1231"
  selfLink: /api/v1/namespaces/kube-system/configmaps/aws-auth
  uid: b6dce19f-de49-42a7-8b24-e609a49cc6a1
Add the system:masters group using the following lines and your IAM role ARN:
apiVersion: v1
data:
  mapRoles: |
    - groups:
      - system:bootstrappers
      - system:nodes
      rolearn: arn:aws:iam::845151661675:role/eksctl-sysdig-test-cluster-n-NodeInstanceRole-10CJF3MXZEYI7
      username: system:node:{{EC2PrivateDNSName}}
    - groups:
      - system:masters
      rolearn: arn:aws:iam::845151661675:role/SysdigAgentHelmRole
      username: helm-deployer
  mapUsers: |
    []
kind: ConfigMap
metadata:
  creationTimestamp: "2021-06-20T18:26:52Z"
  name: aws-auth
  namespace: kube-system
  resourceVersion: "270538"
  selfLink: /api/v1/namespaces/kube-system/configmaps/aws-auth
  uid: b6dce19f-de49-42a7-8b24-e609a49cc6a1
You have also to create a clusterrolebinding for the helm-deployer username:
kubectl create clusterrolebinding helm-deployer --clusterrole=cluster-admin --user=helm-deployer
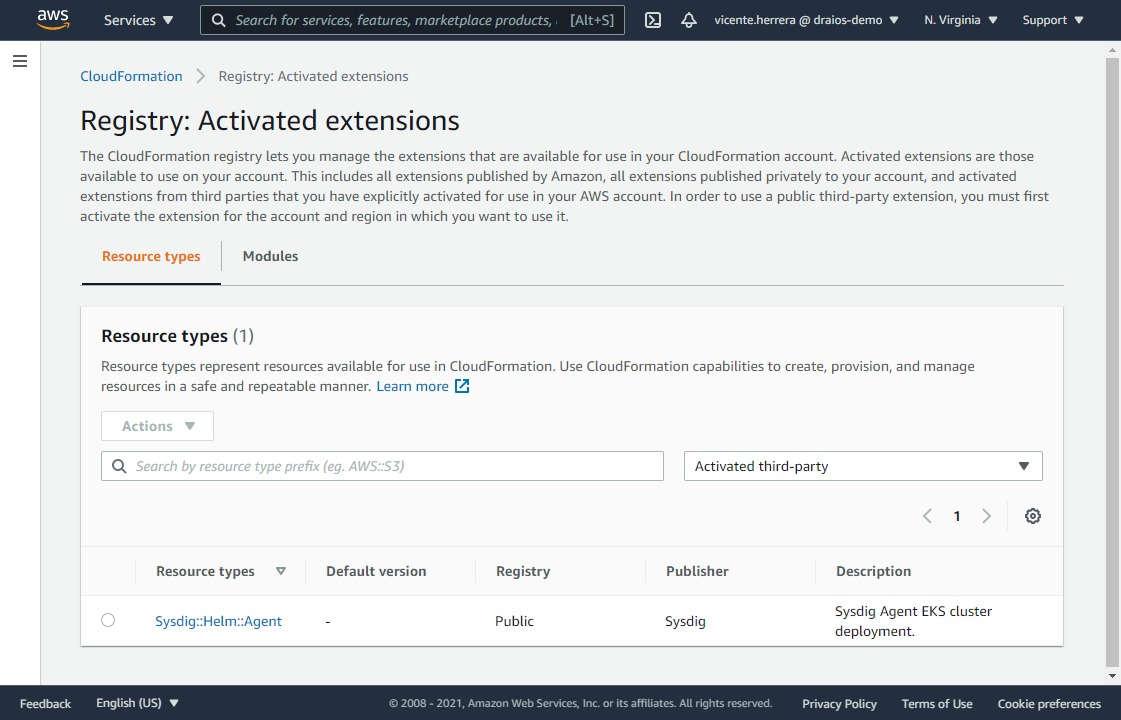
Enable the Sysdig::Helm::Agent third party CloudFormation extension
Now everything is ready to enable the extension.
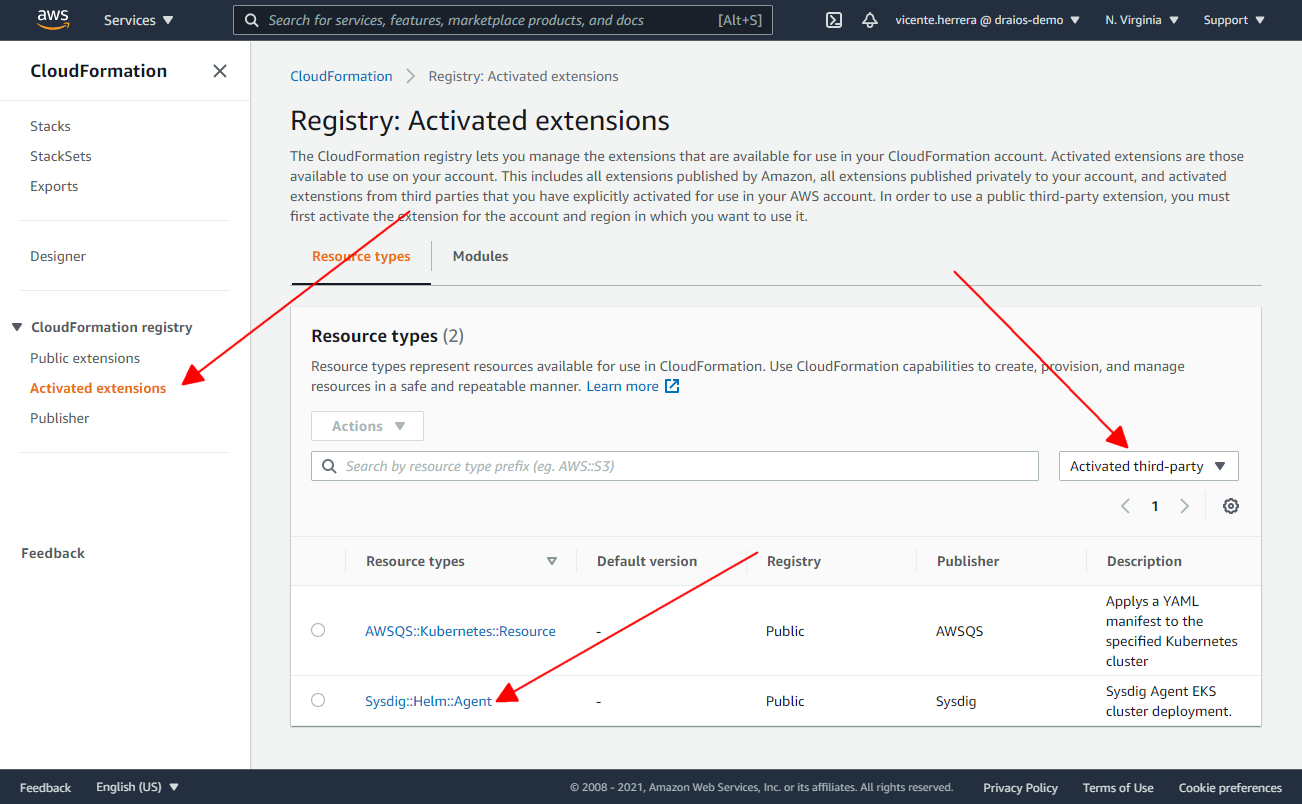
Visit the CloudFormation section on the AWS Console. Click on the hamburger menu icon if necessary to show the side menu, under CloudFormation registry, click on Public extensions, select Extension type: Resource types, and Publisher: Third part, and search for “Sysdig”.
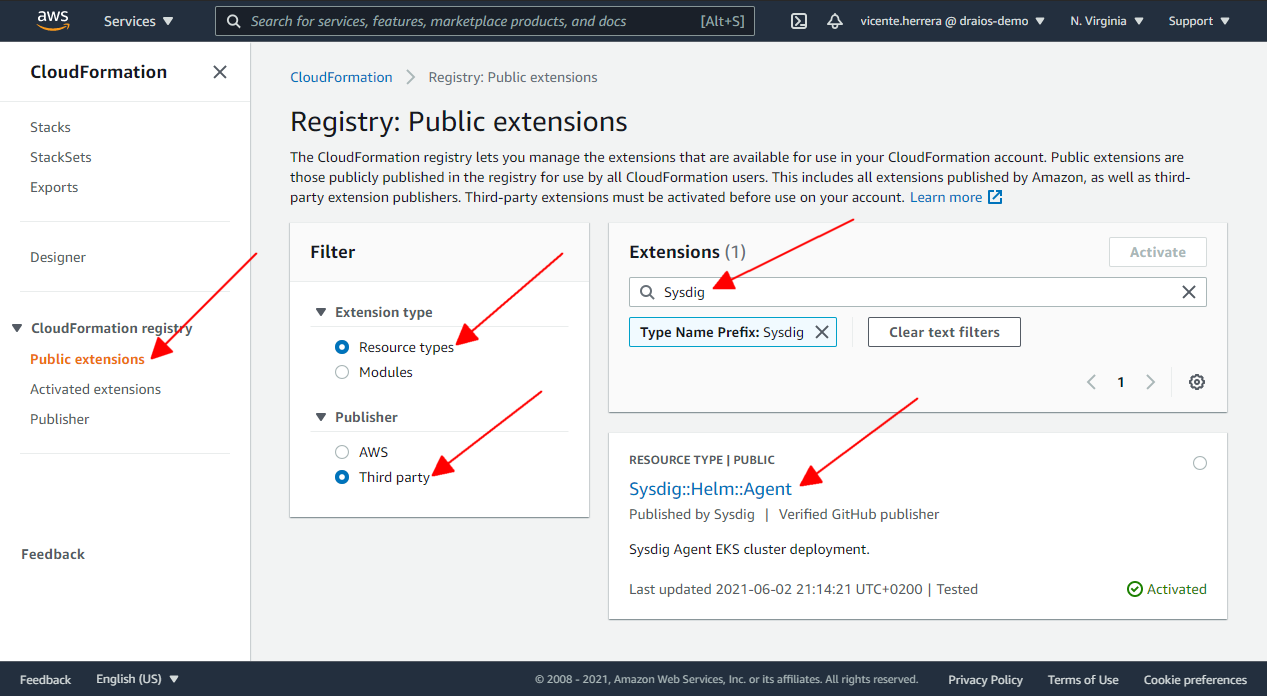
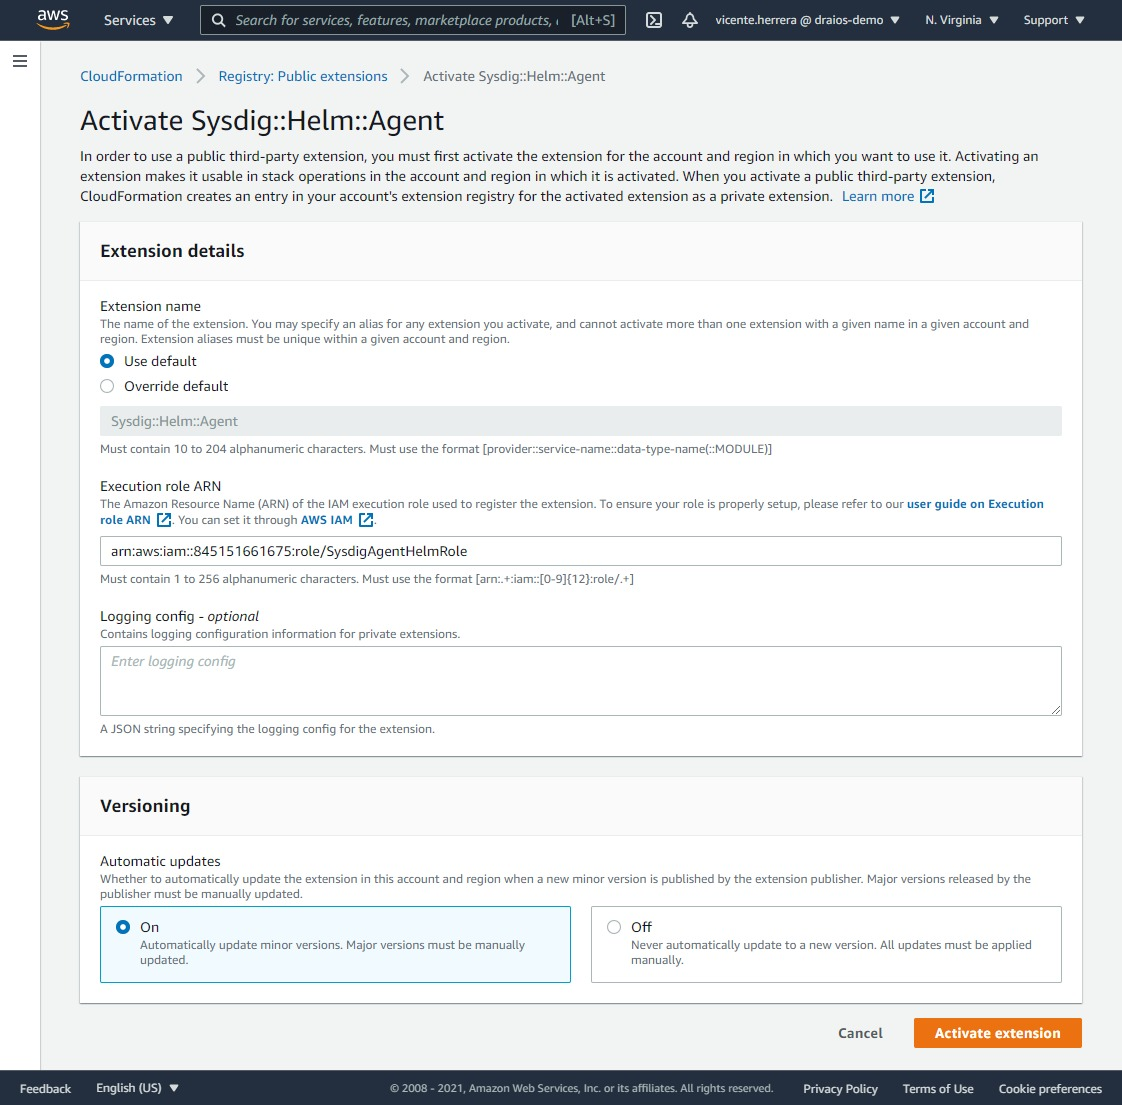
Click on the Sysdig::Helm::Agent item. Then on the details of this extension, click on Activate and select the default extension name of “Sysdig::Helm::Agent” (if you already have activated this extension, it will not allow you to use that name again).
Now if you visit the Activated extensions section, and filter by “Activated third-party”, you should see the Sysdig::Helm::Agent extension enabled in your account.
On the next screen, you have to specify if you want to use the default name for the extension when you add it to the list of the activated ones, or you prefer to provide your own; the ARN of the IAM role “SysdigHelmAgentRole” we created previously. Click the “Activate extension” button.
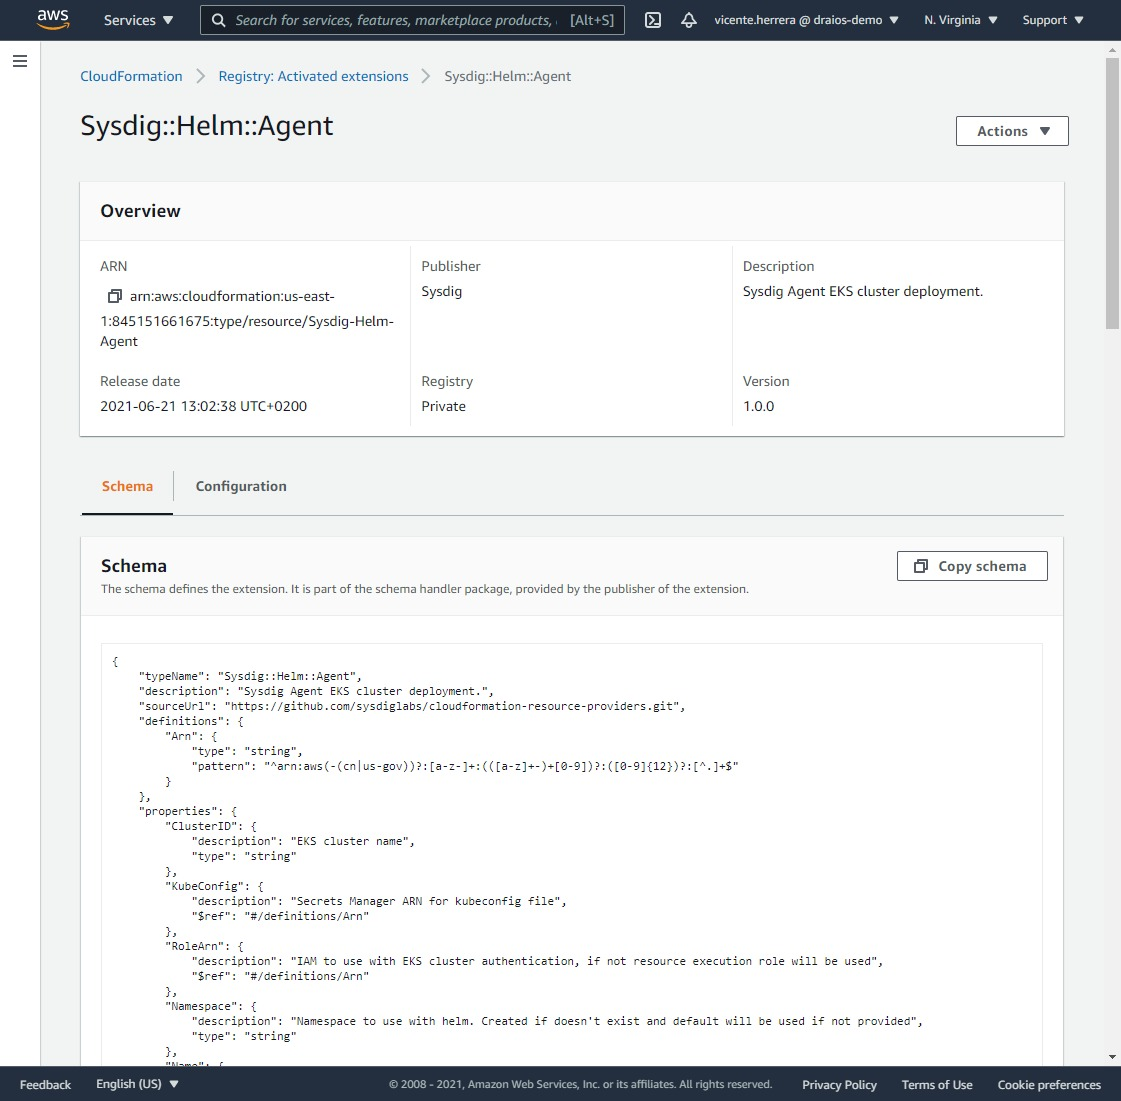
You will be presented with a summary page for this activated extension, and if you visit the list for all the activated extensions, Sysdig::Helm::Agent should now appear.
Then, you can deploy it on an existing cluster using a very simple CloudFormation template that automates the installation procedure:
AWSTemplateFormatVersion: "2010-09-09"
Description: "Deploy Sysdig Agent"
Parameters:
  ClusterName:
    Type: String
    Default: eks-cluster-name
  AccessKey:
    NoEcho: 'true'
    Type: String
Resources:
  HelmChart:
    Type: "Sysdig::Helm::Agent"
    Properties:
      ClusterID: !Ref ClusterName
      Namespace: sysdig
      Values:
        sysdig.accessKey: !Ref AccessKey
        sysdig.settings.collector: ingest-eu1.app.sysdig.com
        sysdig.settings.collector_port: 6443
        clusterName: !Ref ClusterName
        nodeAnalyzer.collectorEndpoint: eu1.app.sysdig.com
You can also edit the template to customize the Values section of it according to the allowed parameters specified in the Sysdig Helm chart documentation.
You can also use the quick template directly from the following link:
When you deploy this template, it will ask you for the name of the EKS cluster where you want to deploy the agent, the Sysdig API Token, and the Sysdig region (they are not related to AWS region, but to how you log in into your Sysdig account, check Sysdig’s official documentation for more information).
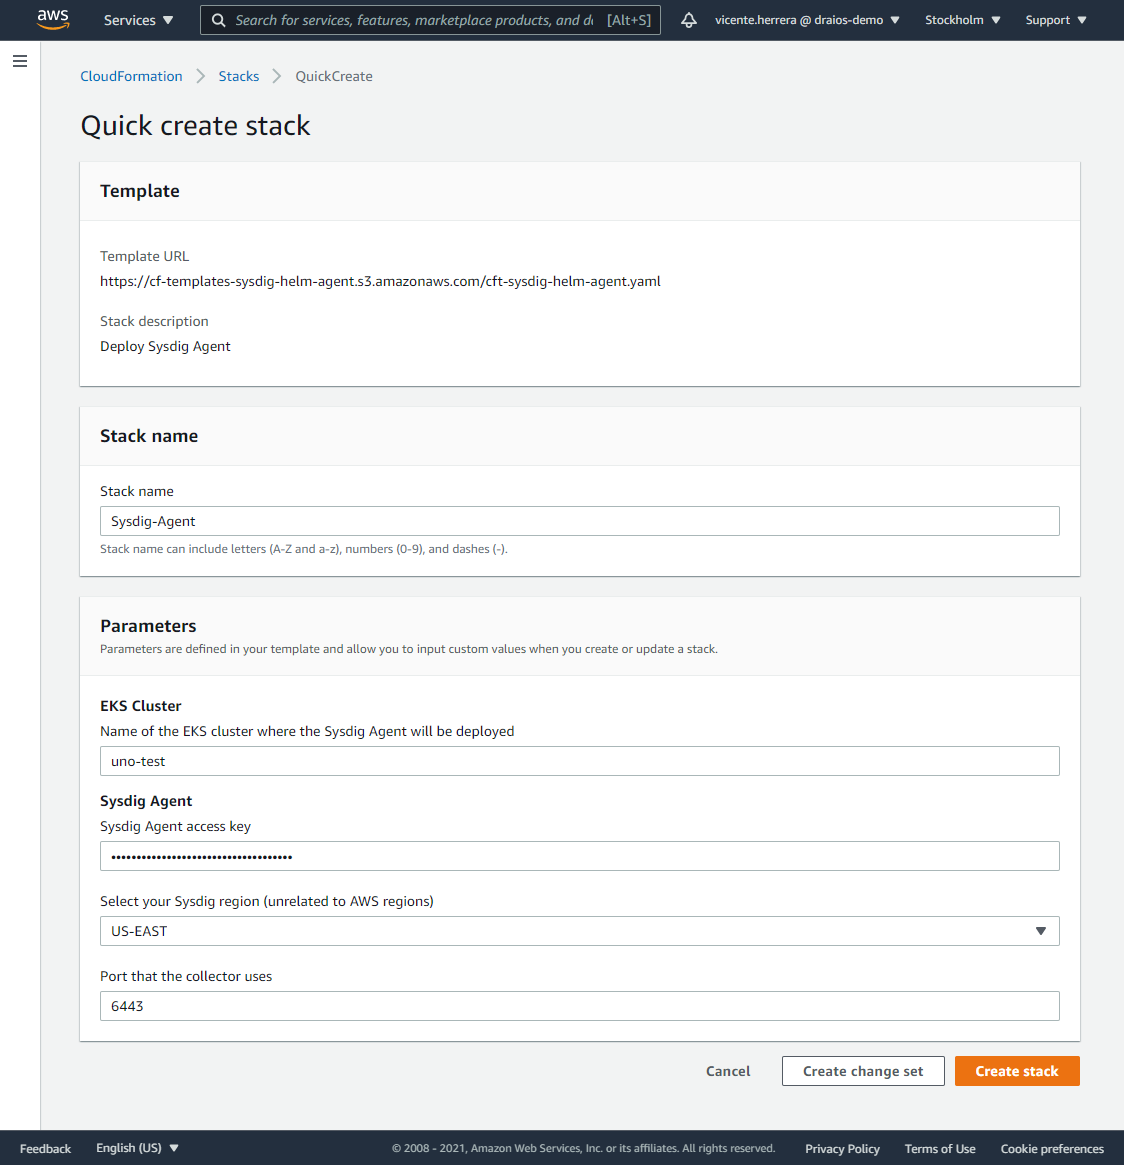
After you click on “Create Stack”, a new stack will install the Sysdig Agent daemonset on your EKS cluster. Wait until it finishes, and you are ready to go.
Once the agent is deployed to your EKS cluster(s) it will begin to auto-discover your containers and collect data and information that will help you secure and monitor your services, applications, and infrastructure. You can read more about security and monitoring for AWS containers and cloud using Sysdig in this guide.

Conclusion
Enabling automation for your cloud stack helps to accelerate DevOps by reducing the level of manual intervention required. CloudFormation templates help you better scale stack deployments in your cloud environment, which will, in turn, help you deploy applications faster in production.
With the new public registry, you can easily tap into third-party extensions like the one from Sysdig outlined above. Using the Sysdig extension, you can save time by streamlining the Sysdig agent deployment in your EKS clusters.
If you’re using EKS and want to try Sysdig and take advantage of the CloudFormation extension, you can get started by requesting a free trial here.